Last week I promised I would write a more technical post. So this week, rather than talking about something I do know about, I’ll be talking about something I don’t know anything about, and then you can all tell me how wrong I am! Which brings me to the topic for this week – shaders!
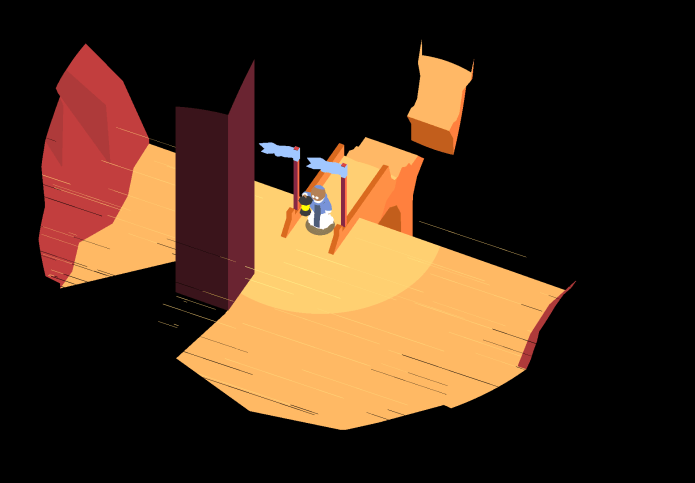
Where Shadows Slumber has a relatively distinct visual style – the bright solid colors, the crisp black shadows, and the sharp line that separates them. Much of the artistic style is due, of course, to Frank’s art. However, a lot of it is also due to the custom shading that we set up.

Bright colors and sharp edges!
What is a Shader?
Unity describes a shader as a ‘small script that contains the mathematical calculations and algorithms for calculating the color of each pixel rendered, based on the lighting input and the Material configuration’. Basically, shaders determine how the rendering will happen, and how the look of your scene will be affected. Shaders give you a lot more control over exactly how everything will be calculated and rendered – lighting, shadows, gloss, reflections, etc. It’s a lot, and shaders get very complicated very quickly, but they allow you to craft a very distinct visual style.
Shaders are (generally) used by creating a material and specifying what shader that material should use for rendering. This allows you to use a shader for multiple materials, with potentially multiple different configurations.
Now, let me give you a quick disclaimer – I know enough about shaders to put together this one for Where Shadows Slumber, but I am definitely not an expert. So take everything I say with a grain of salt, and if you are an expert on shaders, feel free to let me know, because I’m sure there are some things I could be doing better.
I should also mention that, while I believe you can write CG shaders for some other engines, any specifics in this post will refer to shaders as they are used in Unity. Similarly, since Where Shadows Slumber uses forward rendering, this shader will also will be set up using forward rendering.
How real light works, and why that’s bad
Unity comes with something called the standard shader, which lets you get a lot of different visual effects without creating your own shader. It’s very powerful and very useful – so why not use it here?
The problem with the standard shader is that it’s too realistic. It calculates lighting based on the way that lights actually work, which is not what we want. A light in real life fades over distance, so it’s brightest at its center and much darker at the edges. While this is accurate, we want all areas that are in light to be the same brightness. Otherwise, the player would be too bright, but the edges of the light would be too dark.
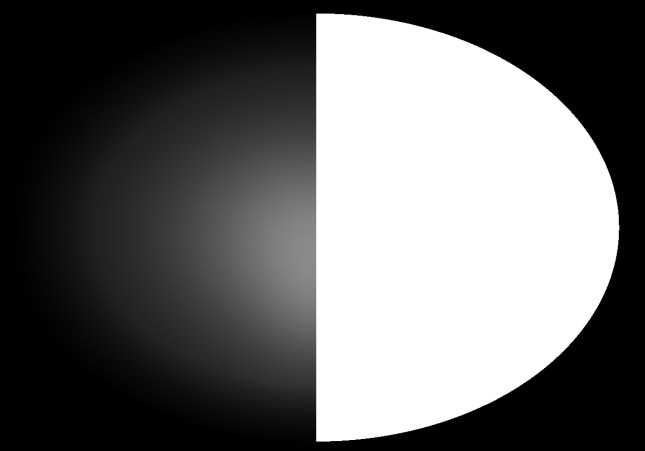
The Unity standard shader (left), and the Where Shadows Slumber shader (right)
Enter our custom shader – in order to get the lighting right, we had to write our own shader, with a custom lighting model. This was a daunting task, but I’ll go through the overall steps we took to get there.
Not the most difficult shader
There are two types of shaders in Unity – Surface, and Vertex/Fragment shaders. Surface shaders are a little easier to write and understand, but they give you less control, as they do a lot of the calculations themselves (in reality, a surface shader is just a wrapper that gets compiled down to a vertex/fragment shader). Fortunately, we don’t really need to get too deep into the calculations for lighting and stuff – we’ll just let the surface shader calculate the lighting, and then we’ll use the results to determine what to draw.
So, we know that we have to make a surface shader. What exactly does that mean? How do we actually go in and start changing things? What does a shader really look like?
Drumroll please…
Our surface shader
Shader "CrispLightBasic_NoDir" {
  Properties {
    _Color("Color", Color) = (1, 1, 1, 1)
    _MainTex("Albedo (RGB)", 2D) = "white" {}
  }
  SubShader {
    Tags {
      "RenderType" = "Opaque"
    }

    CGPROGRAM
    #pragma surface surf TestForward addshadow fullforwardshadows
    #pragma target 2.0
    fixed4 _Color;
    sampler2D _MainTex;

    struct Input
    {
      float2 uv_MainTex;
    };

    void surf (Input IN, inout SurfaceOutput o)
    {
      fixed4 c = tex2D(_MainTex, IN.uv_MainTex) * _Color;
      o.Albedo = c.rgb;
    }

    half4 LightingTestForward(SurfaceOutput s, half3 lightDir, half atten)
    {
      half4 c;
      c.rgb = s.Albedo * _LightColor0.rgb * min(floor(300*atten), 1);
      c.a = 1;
      return c;
    }

    ENDCG
  }
  FallBack "Diffuse"
}
This is the simplest shader that we use in Where Shadows Slumber. It’s pretty self-explanatory, so I’ll let you figure it out.
…
…
…
Alright, I guess we can take a look at what’s actually happening here.
Anatomy of a shader
There are a lot of cool parts to a shader; let’s take a look at them from the top down.
-
Shader "CrispLightBasic_NoDir"
Starting with an easy one! This just means that we’re making a shader, and giving it a name.
-
Properties {
  _Color("Color", Color) = (1, 1, 1, 1)
  _MainTex("Albedo (RGB)", 2D) = "white" {}
}
I like to think of the properties as ‘inputs’ to your shader. When you examine a material using your shader in the Unity inspector, these are the values that you will be able to change in order to get a different look.
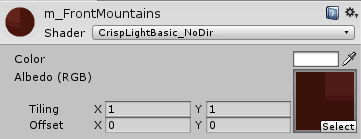
A material with our shader in Unity
The line for each property consists of a name, an identifying string (which is what you’ll see in the inspector), a type, and a default value, in order. So our color variable has the name
_Color, the description"Color", the typeColor, and the default value(1, 1, 1, 1).The possible types for a property are
Int,Float,Range,Color,Vector, and2D(which represents a 2-dimensional texture). -
SubShader {This just means that we’re actually starting the real shader block.
-
Tags {
  "RenderType" = "Opaque"
}
Tags are a way of telling Unity some stuff about the shader we’re writing. Unlike the properties above, these are constant to the shader. So, for this shader, we are telling Unity that this shader will always have a
RenderTypeofOpaque.There are a few different tags you can use, and each of them have a few different options. In the interest of shortness, I won’t go into all of them here.
-
CGPROGRAM
...
ENDCG
These directives indicate that the actual CG code is contained between them. The CG code is what does the actual shading.
-
#pragma surface surf TestForward addshadow fullforwardshadows
#pragma target 2.0
#pragmastatements indicate which shader functions to compile into your shader.The
targetpragma indicates the shader compilation target level – higher targets allow the use of more modern GPU functionality, but may prevent the shader from working on older GPUs.2.0is pretty low, since we aren’t going to end up doing anything fancy.The
#pragma surfacedirective indicates information about our surface shader, and is always of the form:#pragma surface surfaceFunction lightModel [optionalparams]Thus, our surfaceFunction is
surfand our lightModel isTestForward(both of which we will define later). The optionalparams which we provided areaddshadowandfullforwardshadows, which allow meshes using our shader to both receive and cast shadows when using forward rendering.This concept of ‘optional parameters’ is kind of vague. Basically, it’s just another way to give information about your shader – this time, the information is about how the actual rendering is done. There are a lot of different options that you can put here, and, unfortunately, it’s not incredibly obvious when you might need one. If you’re not doing anything funky with your shader (lights, shadows, depth-testing, etc.), you’re probably fine. If you are, you might want to see if there are any optional params here you should be using.
-
fixed4 _Color;
sampler2D _MainTex;
Remember those properties we declared earlier? Those guys are cool and all, but these are the real variables used by the shader. Any of the properties you declared needs a variable (of the correct type) here, so that your shader can actually use the value you provided! In this case, we’re creating a
fixed4variable for our color value, and asampler2Dvariable for our main texture. The data types for these variables are kind of strange, so let’s take a look:–
float,half, andfixed– these all represent floating-point numbers, with different precisions. The precisions are (generally) 32, 16, and 11 bits, respectively.–
float4,half4, andfixed4– these are 4-dimensional vector versions of the above types. They’re used for vectors (duh), but also for colors, which are of the form(r, g, b, a)–
sampler2D,sampler3D, andsamplerCUBE– these sampler types represent textures; 2D is a 2D texture, 3D is a 3D texture, and CUBE is a cubemap. -
struct Input
{
  float2 uv_MainTex;
};
The
Inputstructure is yet another representation of information passed to the shader, and generally contains texture coordinates. Texture coordinates must be nameduvfollowed by texture name, and indicate positions of pixels on your textures. There are a bunch of other values you can put here, but, once again, I’m not going to list them all. -
void surf (Input IN, inout SurfaceOutput o)
{
  fixed4 c = tex2D(_MainTex, IN.uv_MainTex) * _Color;
  o.Albedo = c.rgb;
}
Ah, finally, here we are! We have made our way to the actual surface shading! This is the surface function that we specified in the
#pragma surfacedirective. This function, at its core, describes the properties of a surface. It takes anInput, which we defined above, and aSurfaceOutput, which actually contains those properties (color, normal, emission, etc.). For our very simple shader, we only care about the color, so that’s the only value that we will provide. Note that it’s marked asinout, meaning that it’s both input and output – it comes in, we make changes to it, and then it gets used later, with those changes.The inside of this function is the important part, as it’s telling us what the shader will do at any given pixel position. Fortunately, this is a pretty simply one:
In the first line, we’re calling
tex2D, a function which performs a texture lookup. So we’re saying we want the color of_MainTexat the pixel coordinate provided byIN.uv_MainTex. This should make sense – after all, we createdIN.uv_MainTexas a way to point to positions within_MainTex, which is exactly what we’re doing. Once we have the pixel color from the texture, we’re multiplying it by our_Colorvariable, which will result in a ‘tinted’ version of the texture. Finally, we are storing the result in afixed4variable, or a 4-dimensional vector offixed-precision floating-point numbers.In the second line, we’re simply assigning the value we just calculated to the
Albedoproperty of theSurfaceOutputvariableo. The albedo color of an object is just the color of that object without any external influences (mainly, light). Since we haven’t applied any lighting yet, this is the property we want to set.So this function is pretty simple – it just gets the colors from the texture and tints them with the color we provided from the Unity inspector. Note that this function doesn’t return anything – it simply sets values on the
SurfaceOutputobject, which is used later. -
half4 LightingTestForward(SurfaceOutput s, half3 lightDir, half atten)
{
  half4 c;
  c.rgb = s.Albedo * _LightColor0.rgb * min(floor(300*atten), 1);
  c.a = 1;
  return c;
}
When we declared our surface shader using the
#pragma surfacedirective above, we also specified a lighting model, which I so cleverly never renamed fromTestForward. This function is where we apply our lighting, and it describes how light affects things. In most cases, the surface shader will handle this for you. However, since we want to give our lighting a somewhat special look, we need to mess around in here too.This function takes in our
SurfaceOutputobject (so we can know stuff about our surface),lightDir(a vector indication the direction the light is hitting the surface), andatten(a number indicating the strength of the light at this point). It returns a vector which indicates the color of the surface after the lighting has been applied. This function will run for every pixel on the surface, which allows us to return different values for each pixel.Since our shader is pretty simple, the logic in this function is simple as well. We create a vector,
c, which we end up returning. We set itsrgbvalues based on the color of the surface (and some other stuff), and set itsa(alpha, or transparency) to 1 (completely opaque).The interesting part of the lighting model (and the whole shader) is the single line of calculation here, so I’ll go through it step by step.
c.rgb– This is the actual color value of the variablec, which is what we want to mess with.s.Albedo– This is the value we set in our surface function. It’s the actual color of the object at this point.* _LightColor0.rgb– Ah, a piece of magic! We’re multiplying the color by something here, but what? Our lighting function will be called on any pixel once for each light that hits it. These are called passes. In forward rendering,_LightColor0represents the color of the light that this pass is applying. So, we’re just tinting our surface’s color by the color of the light.
There are two things to note here. These lighting passes only apply to per-pixel lights. Lighting is expensive, so the Unity quality settings will max out the number of per-pixel lights you can have. In order to create our look, we needed every light to be per-pixel, so we had to increase the cap.
The other thing is the concept of blending. Since we may have multiple lights hitting the same spot, we’ll have two different color values for that spot. Unity needs to know how to combine them, and the default behavior is additive. This means that overlap between lights will be twice as bright, which may give it a ‘washed-out’ look. I won’t cover it here, but there are ways to change the blending behavior to achieve the look you want.* min(floor(300*atten), 1)– Here’s the interesting part.attentells you how bright the light is at this point; it gets lower as you move away from the source of the light. A normal lighting model would multiply the color byatten, which would result in a nice fading look. However, we don’t want any values in between 0 and 1. We want the light to be either on or off. So, this funky piece of math basically says ‘if the attenuation is above 0.003, show the whole color. Otherwise, show a shadow’. This is how we disregard the ‘fading’ of the light without disregarding where the light actually reaches.
-
FallBack "Diffuse"
We started with something simple, and it looks like we’re gonna end that way too. The fallback shader is the shader that should be used if, for whatever reason, our custom shader is unable to be run on the GPU. This could happen if we’re running on older hardware, we specified too high of a shader compilation target level, or we simply made a mistake in the shader code. I find that the latter is almost always the case, as writing shaders correctly is so confusing as to be near-impossible.

The beautiful color of a broken shader!
Note that the fallback should be inside the shader block, but outside of the subshader block.
Putting it all together
Going through the shader piece by piece took a lot longer than I thought it would, so I won’t go too in-depth here. Most of the shader is boilerplate, so there’s not too much happening anyways.
Basically, we’ve built a surface shader which accepts a texture and a color. We tell that shader that it’s opaque, that it should use shadows, and that it should compile to a very low set of GPU requirements. We also tell it to use a custom surface function to describe the properties of the surface, and a custom lighting model to figure out how light affects that surface. Together, these functions will tell us exactly what color each pixel should be rendered as.
Within the surface function, we simply grab the color from the provided texture, tint it with the provided color, and pass it along. Within the lighting function, we either return the color of the surface, tinted by the color of the light (if the pixel is within the light), or return the color black (if the pixel is in shadow). In this way, everything that is at all touched by light will show up as its full color, and anything in shadow will show up as a crisp, dark black.
Additional resources
Hopefully this adventure into shader-land has given you an idea of how shaders work, and what it was like to work with them. Like I said, I’m not a shader expert, so there may be some stuff you still want to know about shaders. Here are a few links that helped me out in my travels:
- Unity’s intro to shaders
- The Unity docs for writing surface shaders
- The Unity forums
- An introduction to shaders, by digitalerr0r
- UnityGem’s intro to shaders
There are probably a hundred other pages I ended up reading on my quest for shader mastery, but I can’t find/remember all of them now. Anyways, sorry for going on about shaders for a metric year. I hope you learned a bit about the mysterious world of shaders, and if not, I just hope you didn’t die of boredom. Either way, if you got to this part of the post, well done!
As always, let us know if you have any questions or comments about shaders (or anything else)! You can always find out more about our game at WhereShadowsSlumber.com, find us on Twitter (@GameRevenant), Facebook, itch.io, or Twitch, and feel free to email us directly with any questions or feedback at contact@GameRevenant.com.
= = = = = = = = = = = = = = = = = = = = = = = = = = = = = = = = = = = =
Jack Kelly is the head developer and designer for Where Shadows Slumber.
