Paradise Found

Now that artistic development of Where Shadows Slumber has begun in earnest, I have embarked on a long journey – creating each of the game’s Worlds. Up until now, we’ve been making demo levels strung together with a vague theme (Canyon, Aqueduct, Tomb) and worked backwards from design to find some kind of artistic through-line. But for the final game, Jack and I are taking a different approach. First, we planned out each of the game’s Worlds. Then, we designed Levels for those Worlds that fit their theme and orbited around a single mechanic. Now I’m at the part of the pipeline where it’s time to actually create modular art assets that can be used to create Levels inside each World.

Let’s unpack some of the jargon in that paragraph.

SPOILER WARNING: This blog post discusses the final World of “Where Shadows Slumber”, which is still in development. Although the game is subject to change, this can potentially ruin your experience if you intend to play the game without knowing where your journey leads. If you don’t want to have it spoiled, do not continue reading.

maxresdefault

What Are Worlds?

Call us old-fashioned, but Jack and I grew up playing games like Super Mario, which was organized around a World/Level paradigm. You had to beat each of the Levels in World 1 in order to progress to World 2.

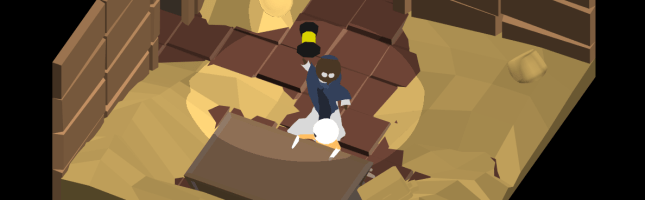
Defining a Level is easy enough because our demo has 9 of them – a Level is a single screen of the game, with a large puzzle to complete. Often it is comprised of multiple smaller puzzles. Some Levels early in the game are designed to introduce Players to new concepts. Levels that come later serve as final exams, testing the Player. Can you put what you’ve learned to use in order to solve a really complex puzzle?

If Levels are just puzzles, Worlds are the aesthetic glue that bundles them together and gives the game a story. A game with 30 grey, silent puzzles is going to rapidly become boring and repetitive. How can you tell a story that way? By grouping our Levels into Worlds, we can indicate to our Player that your character is traveling on a journey. You start in a Forest World – eventually, you get to a City World. The developers are making a clear statement: this game exists in a physical space, and your character’s success in his journey is based on whether or not he reaches his destination.

Best of all, we don’t need to use a lot of words to communicate this during the game. Once you realize you’ve completed a World and moved on to a new one that looks radically different, there’s a sense of accomplishment. Even better, curiosity drives the Player’s engagement from this point onward. “What other Worlds did they put in the game?”, one wonders. “I have to beat this Level. It’s the last one in World 4, and I’m dying to see World 5!”

bermuda-after-xl

Inspirations For World 7 – “Paradise”

Now that we’ve defined what Worlds are, we can discuss my process for designing what each one looks like. For this blog post I decided to focus on my current project, World 7 – “Paradise”. Don’t get your hopes up here! I’m not working on these chronologically. I actually started with World 7. This is by no means an indication that I’m almost done with the game’s artwork. Not even close.

Most of the Worlds in our game are inspired by real life locations. The Forest World is obviously inspired by large wooded areas in temperate zones. Some Worlds have even more specific inspirations, however. World 7 is supposed to be a paradise – a floating garden in the clouds where your journey ends. I wanted to make it feel heavenly and relaxing without relying on tired mythological tropes like pearly gates and clouds. What to do?

“You go to heaven if you want to — I’d rather stay right here in Bermuda.”

– Mark Twain, during his final visit to the island shortly before his death.

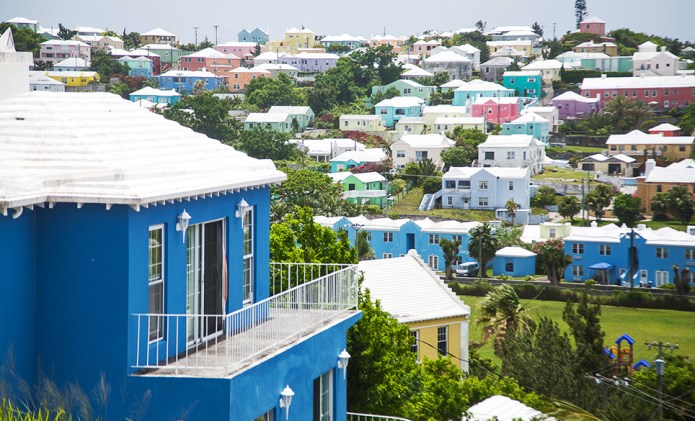
I decided to use the unique architecture found on the island of Bermuda as a template. The tropical island is quite beautiful due to its crystal clear blue water, pink sand beaches, and lush vegetation. But in my many visits to the island (my family loves to travel there) I have found that the human architecture adds to the island’s beauty, rather than detract from it.

p532571176-3

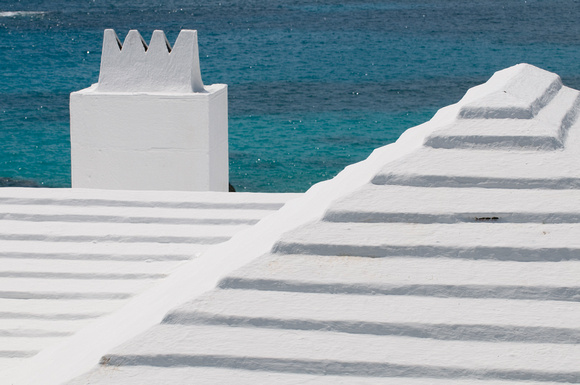
Since Bermuda is an island in the ocean, fresh water is scarce. They must collect rain water from whatever storms pass by and hoard them in water tanks underneath their homes. Because of this technology, every single roof in Bermuda is made from white limestone and has a ridged pyramid-like shape, optimized for water collection. I’ve never seen it anywhere else, and I find the uniformity soothing – like small white mountains popping out amidst the island’s trees.

I’m not sure why, but home owners in Bermuda have also taken to painting their stone houses with bright pastel colors that really stand out. Everything from dark cerulean, pink, yellow, light red, teal, and even bright green can be found as you glance at a Bermudian city. It’s a welcome departure from the reddish brick of Hoboken, New Jersey – not to mention the grey steel glass of nearby Manhattan. The entire island of Bermuda is brimming with life, and the island’s human residents don’t mire the look of the tropical paradise one bit.

cherry-blossom-4

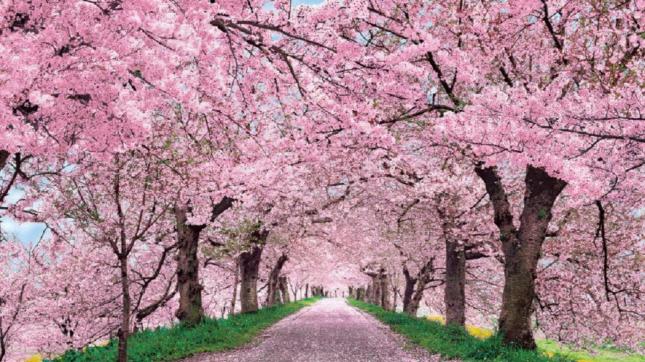
On a separate note, I’ve always found the Japanese cherry blossom to be both vibrantly beautiful and soothing. In full bloom, they have dazzling pink flowers at the tip of each branch. They fit better into this “Bermuda as heavenly paradise” design than palm trees do, so I’d like to include them as well.

bermuda-rooftops-houses-colorful

Picking Crayons – A Color Palette For Paradise

Once I decided that this tropical paradise would become our game’s final destination, I set out to capture the beauty in an organized fashion. I asked myself two important questions:

  1. If you could use no more than 10 colors, which ones best represent Bermuda?
  2. What is the best way to create a modular set of pieces that can be used to build similar architecture?

The result of the first question is found below. This is the color palette for World 7. It’s a bit like picking out only certain crayons from the box and sticking with them. Deciding on a color palette is a good way to rein in my creativity and make sure I’m not just picking random colors when it comes time to make the real game.

ColorPalettes_7_Paradise

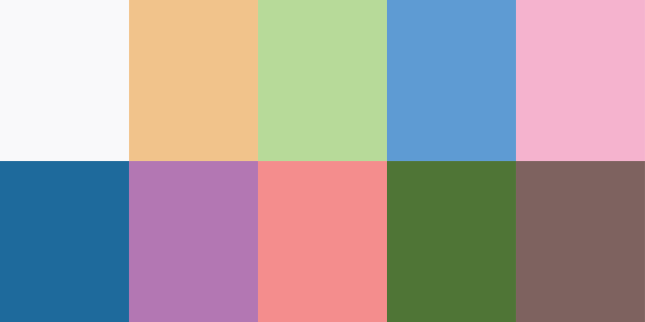
I created this by using some images of Bermuda from Google Images and picking out colors with the eyedropper tool in Photoshop. It’s a good way of breaking out of my shell in order to use tones and hues I might otherwise not select from a color wheel. Snaking from top left, to bottom left, and then to the next row:

  • Limestone White: This white color will be used for rooftops in this World.
  • Limestone Blue: This blue is actually going to be used for when the limestone is in shadow, for a stark contrast.
  • Yellow, Purple, Green, Red: These four colors are going to be what houses are painted with. I picked the most Easter-ish ones I could find.
  • Sky Blue: Since this World is floating, you’ll be able to see the sky in the background. This solid color will serve that purpose.
  • Dark Green: The grass and trees in this World are a lush green.
  • Cherry Pink: I want to have cherry blossoms in full bloom in this World.
  • Cherry Brown: The cherry trees need to have a bark, after all. But not too dark!

There’s no way I’ll stick to just these colors, but it serves as a good baseline. You can tell just by looking at the grid of 10 above that this World is brighter and more peaceful than the ones preceding it. I hope it will be a welcome sight to Players who have reached the end of our game.

3DSMAX

Modeling Modular Members of Paradise

Say that 10 times fast.

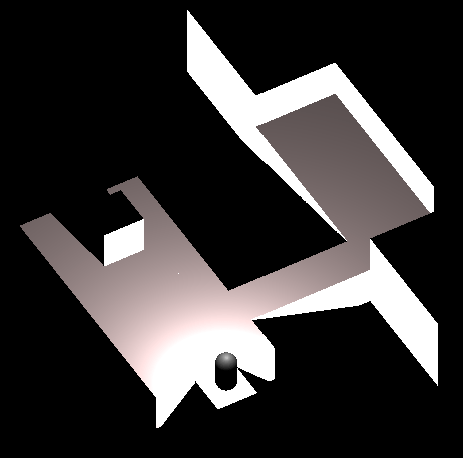
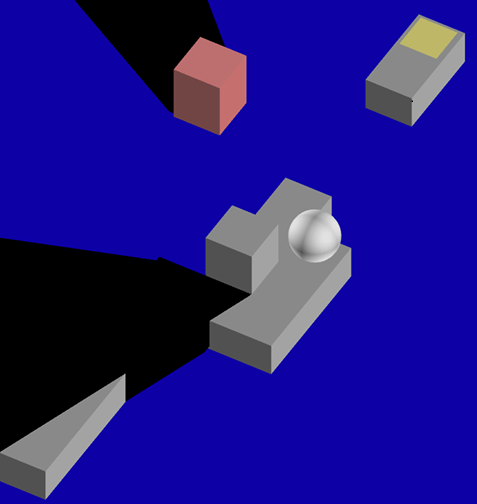
Once we know what the final result will look like, and we have colors and reference images to guide us, it’s time to model some pieces in 3D. To build a Level in this grid-based puzzle game, we need 1×1 pieces that can snap together to form walkways, obstacles, and doorways.

As you can see from the Autodesk 3DS Max screenshot above, each piece is modeled separately and laid out in an organized manner. They are precisely the size they need to be, and their rotation is preset so that we don’t have to mess with them in Unity. With an organized set of tiles like this, even a non-artist member of the team can snap them together like jigsaw pieces.

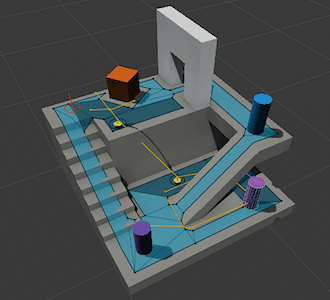
It might not look like much, but when they are combined together in Unity, they can form complete shapes that resemble Bermuda:

Bermuda

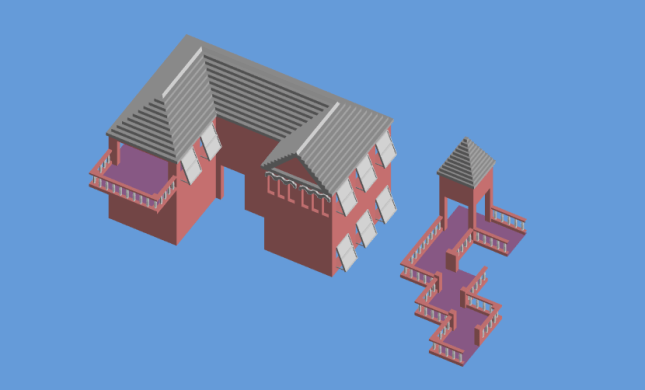
Assembled in Unity entirely from modular World 7 pieces.

This process is not yet complete, but I feel confident in the direction I’m heading. The floor tiles all have beautiful banisters on them. The roof tiles (purely decorative) mirror the strange step-like quality of Bermuda’s. The open shutters give a sense that the island is prepared for the worst, but enjoying the calm before the storm.

I’ll post more process pictures as I complete more 3D models. But until then, I hope you’ve enjoyed this in-depth look at how much work goes into designing a single World of the game. Hopefully this front-loaded design work makes it easier to create beautiful Levels later down the road.


= = = = = = = = = = = = = = = = = = = = = = = = = = = = = = = = = = = =

Got a picture of Bermuda you’d like to share? Have a question about aesthetic design that was not answered here? You can find out more about our game at WhereShadowsSlumber.com, ask us on Twitter (@GameRevenant), Facebook, itch.io, or Twitch, and feel free to email us directly at contact@GameRevenant.com.

Frank DiCola is the founder of Game Revenant and the artist for Where Shadows Slumber.

Mechanic Spotlight: Pathfinding

For a game like Where Shadows Slumber, the most basic interaction you have is to tell the character to move to a spot. If he’s a good boy, he’ll do what you say, deftly dodging pillars and chasms as he winds his way toward the destination. You don’t even have to tell him how to get there – he’ll figure it out!

This leads us to the topic of pathfinding, the process by which the character figures out where to move. Pathfinding is very common in game development, and can be summed up with a single question:

How do you get from point A to point B? Rather, what’s the best way to get from point A to point B?

This is the question that encapsulates the idea of pathfinding. In the real world, I tend to take whatever public transit is available, and walk the rest of the way. Some people open up their GPS, hop in their car, and follow the directions. You could even simply determine the direction you’re going, grab a compass, and just start walking.

Each of these is an example of a pathfinding algorithm. The algorithm is a set of instructions which determines exactly how to get somewhere. Pathfinding algorithms in games are a little different from the ones listed above, but the concept remains the same. Given a starting point, a destination, and some information about the surroundings, how should you get there?


Finding a Path in the Darkness

Pathfinding is a pretty common concept in computer science, even outside of gaming. It has received a lot of attention and study in the computer science world, so I won’t get into the intricate details and just stick to the broader points. If you want more details, there are plenty of pathfinding intros and tutorials out there.

silnxeb6eaey

The leading theory for the motivation behind Dijkstra’s Algorithm

Some number of years ago, a cool bro by the name of Dijkstra came up with a good pathfinding algorithm, appropriately dubbed Dijkstra’s Algorithm. Years later, a variant known as A* Pathfinding is still a favorite among game developers, and is the algorithm I decided to use for Where Shadows Slumber.

The basic idea behind A* is to divide your map into a set of areas, which I have taken to calling ‘nodes’. For each of these nodes, you determine which other nodes it’s connected to, and how hard it is to move between the nodes.

What do I mean by that? Imagine you’re standing in front of a fence, and you want to cross to the other side. In this case, the best path is probably just to climb over it. However, if there’s an open gate in the fence a few feet away, that might be the best route to take. Even though you’re travelling more distance, that path is faster, or at least easier. In the same way, each node has a ‘pathfinding cost’, indicating the difficulty to cross it. Our ground node might have a cost of 1, whereas the fence node could have a much higher cost of 10 or so, since it’s so much more difficult to cross.

Once you know what your nodes are, and how they’re connected, the A* algorithm will efficiently loop through and figure out which nodes you should travel over. After that, all you have to do is move the character from one node to the next, and you have pathfinding!


Nodes

I kind of glossed over the whole idea of nodes earlier. A node is a representation of a point in which the character can stand. He cannot stand anywhere where there isn’t a node, or in between two nodes, and he can only travel from node to node. Every path in the game is made up of nodes.

Pathfinding1

An ‘under-the-hood’ look at nodes in Where Shadows Slumber

A node consists of three parts:

  • The node position, shown as a dark sphere in the center of the node, indicates the position the character will be in when he is on this node. This position is usually the same as the node’s position, but there are some cases where it needs to be different.
  • The click detector, shown as a blue cube, is simply a big box with a collider on it. That way, we can detect when you click on the node, and start the pathfinding. Different types of nodes can have different colliders – a normal node has a cube collider, but a ramp node might have a triangular prism collider or something.
  • The boundaries, shown as small pink spheres, determine which other nodes this node is connected to. Since nodes are appearing and disappearing throughout the game, we need to be able to know which nodes should be connected. If two boundaries are in the same location, that means their nodes are connected. In the image, each node along the path is connected to the next, because their boundaries are in the same spots.

With these three parts, the nodes are able to fit together and provide all of the information necessary to, at any point, determine what path the character should take.


Follow the Path

Once we determine the path, then what? How do we follow it? A path is a series of steps: move from Node A to Node B, then move from Node B to Node C, and so on. To this end, the nodes each have another property: nextNodeInPath. Each node stores a reference to the next node in the path. In every frame, the character checks his current node. If it has a next node, the next node is still enabled, and the two nodes are still connected, then he starts moving there!

Pathfinding2

Using Debug.DrawLine to show the character’s path in light blue

In this way, the character will make his way along the path determined by the algorithm. If he comes to a node which he can no longer get to, then he’ll stop. This allows us to create a path, and we don’t have to think about it too much after that. The player will automatically follow the path, and, if the path somehow becomes broken, he’ll stop at the end of it.


Unity’s Pathfinding

If you’re familiar with Unity, you may have heard that, being a nice little game engine, Unity provides its own pathfinding. In fact, the earliest versions of Where Shadows Slumber used Unity’s pathfinding.

However, Unity’s pathfinding didn’t end up being what we wanted for this game. In the same way that Unity’s Standard Shader was too detailed for out game, we found that Unity’s pathfinding gave the player too many options. Where Shadows Slumber was designed to be grid-based, whereas Unity’s pathfinding allows the player to roam around within different areas.

navmeshcover

Unity’s pathfinding

While this isn’t too bad – it wouldn’t be hard to use Unity’s pathfinding, but restrict it to a grid space – there is a reason we decided against using it. One of my professors always told me that ‘you can never know how efficient – or inefficient – a piece of code is, unless you wrote it yourself’. This is a piece of advice I have carried with me ever since, as I find it to be fairly accurate. Therefore, unless Unity’s pathfinding provides exactly what I want, it makes more sense to implement my own pathfinding system. That way, I can know exactly what’s good or bad about my system, what sacrifices I can make, and how best to use it.

Don’t get me wrong – Unity’s pathfinding is pretty cool, and if it makes sense for your game, you should use it. It’s just not the exact solution we needed, so we decided to implement our own.

So, that’s how pathfinding is implemented in Where Shadows Slumber! As I mentioned, I skipped over a lot of the finer details, but I hope this was a good, quick intro to the way that we implemented pathfinding and some of the choices we made.

If you have any questions or comments about pathfinding (or anything else), you can always find out more about our game at WhereShadowsSlumber.com, find us on Twitter (@GameRevenant), Facebook, itch.io, or Twitch, and feel free to email us directly with any questions or feedback at contact@GameRevenant.com.


= = = = = = = = = = = = = = = = = = = = = = = = = = = = = = = = = = = =

Jack Kelly is the head developer and designer for Where Shadows Slumber.

Art Spotlight: Cutscenes, Part II

I’m happy to report that as of today, the demo’s final cutscene is complete. This signals the end of an era – we won’t be updating the demo much more after this. You’ll be able to see the cutscene when you beat Level 9, right before we roll the credits. The next time we update the demo will be when we add language support for multiple regions – and we’re only doing that so we have some practice before we do it for real in the final game.

You can watch the cutscene below, using this YouTube link. Forgive the resolution, but remember – this will be playing in portrait mode on phones and tablets. It’s not meant for a wide screen like your computer.


I suggest you watch it before reading the rest of this blog post! It’s 90 seconds long and includes sound, so get your headphones. It may be “safe for work”, depending on where you work I guess… more on that in the next section.


M

Why Is The Demo Rated “M” on Google Play?

You’re looking at it. The story of Where Shadows Slumber is rather grim, and includes some violent imagery. For this reason, I chose to give the game’s demo an M rating when I uploaded it to Google Play. It’s entirely possible that I overshot things. Perhaps this is more of a “T” level of violence, or possibly even “E” for cartoon violence. I’d rather err on the side of caution. We took a chance with Apple by going for 9+ under the label “Infrequent / Mild Horror / Fear Themes”.

This is a bold step Jack and I have taken, and it remains to be seen whether or not it pays off. Many fans have told us that their young children (4 to 9 years of age) really enjoyed playing the demo. We may alienate those users by having such violent story elements in the game. It’s possible that the final game will include a Safe Mode where all of the game’s movies are instantly skipped without alerting the player. Or maybe we’re being too cautious.

The reception we get to this cutscene will greatly impact the game’s final story. Right now it’s a bit violent, with few hopeful moments along the way. If an official from Apple or Google warns us that this will turn off large groups of users, you may see a more sanitized version of this story appear next year when we release the game. My hope is that we actually attract people by giving them a narrative with teeth that tells a meaningful, adult story. Time will tell if I am wrong!


Cloth

When you examine the edges on the skirt, it becomes clear how it can’t deform properly.

This Cutscene: What Went Wrong

Many close friends of the developers have asked us why we bothered to make this cutscene at all. As I stated in Part I of this series, this was a huge endeavor that required over 40 man-hours to complete, over a span of a few weeks. Since it will not be included in the final game, why spend all that time on it? Most players will never even watch this cutscene, and it is only tangentially related to the final game.

I’ll tell you why – it’s because it was a darn good learning experience, that’s why! The process of making this cutscene was grueling, and it showed me a few ways I could improve my process in the future. Since we want the final game to have somewhere around 16 cutscenes, it’s important to work efficiently. Otherwise, you can expect that number to drop to about 3. Without further ado, here’s three things that I could do better in the future:

Cloth Simulation: The protagonist is wearing two robes. One is a white cassock that has sleeves and a skirt. The other is a blue priestly-looking mantle. For the most part, this cloth is controlled by following the character’s bones. That is, when his right arm moves, his right sleeve goes along for the ride. But his skirt is controlled by 30 separate bones, which is stupid. I hate that I built him that way, and I have resolved to change him for the final game. I’d much rather have 3DS Max simulate the skirt as cloth, and then bring that animation into Unity. I’ll sacrifice control, but I’ll gain time. It’s worth it!

Footstep Audio: Most of the effort that went into recording sound was spent creating the sound of footsteps. I’m not really pleased with how they came out, because they are very loud and a bit too prominent. Regardless, it struck me that I ought to be able to automatically generate these “footfalls”. Jack set up a system to do this in the game itself, so we could have done it in the cutscene with different parameters. Alas, I only just thought of it, so I spent a ton of time painstakingly matching footstep sounds with the animations on screen. In general, having an audio expert who is a part of the team (and receives a cut of the game’s proceeds, or some kind of salary) would save a lot of time.

Character Rigging: This is kind of related to the cloth comment above, but it’s worth mentioning that these characters were measured and found wanting once I really began animating them. Their left arm broke and began bending oddly. Their shin bones contorted out of proportion. Their faces are weird, ranging from expressionless to cartoonish. These things are all my fault, and I need to retrain myself in 3D rigging before I redo the character model for the final game.


sddefault

If you’re investing in a sound recorder, the Zoom H4n Pro is a good choice for indies.

This Cutscene: Strategies That Paid Off

It wasn’t all bad, though! There were some strategies I employed that paid off in the end. Either they worked better than expected, or they allowed me to create a passable product so I could move on from this. 10 / 10 would do again:

Zoom Recorder: I recorded the sound for this demo cutscene using a Zoom H4n Pro field recorder. It’s a lightweight microphone the size of an old Gameboy that I used a lot in college. Now that I have my own (or rather, the company has its own) I have to say I’m quite pleased with it. If we don’t hire a dedicated sound team member, I’ll have no qualms about recording everything myself using the Zoom.

Audacity Mixer: Audacity is a free sound mixing program, and it got the job done. It has its quirks and I’d happily switch to another free program if I could find a better one. But for now, I know how to use it and it didn’t give me too much trouble. The final game’s audio will be made in Audacity unless I switch to an Adobe sound program since I’m paying for that whole suite anyway.

3DS CAT and Unity: The pipeline from 3DS Max to Unity worked as intended. I never experienced any problems getting Finale.FBX out of my animation program and into the Unity scene. This is promising, and it means 3DS Max will remain my tool of choice as we head into the final game.


Rekt

Coming To A Build Near You

I can’t exactly say when, but this cutscene will be added to the demo build at some point in the future. We’re trying not to do too much more to the demo build since it won’t make us any money and may not even guarantee future sales of the real game. Still, it should put to bed any questions people have about whether or not Where Shadows Slumber will have a story when it is released next year. It will hopefully also give us insight into how people might react to the final game’s narrative. If we see a massive spike in bad reviews right after we patch this into the demo, we’ll get the message loud and clear.

Thanks for reading this series! I hope it was an informative look behind the scenes. Feel free to send in any questions you may have – it’s possible I’ll do a third one of these at some point where I just answer questions from fans.


= = = = = = = = = = = = = = = = = = = = = = = = = = = = = = = = = = = =

Looking for something about cutscenes that wasn’t addressed? You can find out more about our game at WhereShadowsSlumber.com, ask us on Twitter (@GameRevenant), Facebook, itch.io, or Twitch, and feel free to email us directly at contact@GameRevenant.com.

Frank DiCola is the founder of Game Revenant and the artist for Where Shadows Slumber.

Where Shadows Slumber: Testing

This week marks the deployment of our first batch of test levels, assuming I haven’t totally screwed up and delayed them. Throughout the past few months, we’ve been building a list of testers, and it is finally time to put it to good use!

If you’re on the list and you have an iOS device, you should have received an invitation to our TestFlight over the weekend. If you’re on Android, you can expect a similar email later this week. If you’re not on the list (or don’t know if you are), just let us know! We haven’t hit the limit on testers yet, and every pair of eyes helps us make a better game.

Frank already wrote about our testing, and why we’re doing it. This post touches on a lot of the same things, but I want to delve a little bit more into the benefits of testing.


Mommy, look what I made!

A child returns home, an exuberant look on her face. “Mommy, look what I made!” she exclaims, holding up a piece of construction paper covered in marker lines and dried macaroni. Her mother reaches down and takes the paper. “Isn’t it great?”

“Why, yes, darling, it’s the most beautiful piece of art I’ve ever seen!”

macaroniwithjack

The original concept art Frank made for Where Shadows Slumber

Now, you and I know that the mother in this story is not telling the truth. Obviously, Where Shadows Slumber is the most beautiful piece of art she’s ever seen. But her daughter doesn’t know that – her daughter planned out the art, decided exactly how she would approach the task, and executed flawlessly.

Frank and I are the daughter in this metaphor, and Where Shadows Slumber is the macaroni masterpiece. We look at our game and we see something beautiful – but who knows what it actually looks like?

You do! You, our adoring public, are our mother. However, we need you to tell us the truth! We will never grow up to be a wonderful artist if you tell us that our macaroni levels are beautifully designed when they’re not.

This is the concept behind a lot of what we have been doing over the past year. We created a demo for the sole purpose of showing it to people and getting feedback about the game. We’re sending out test levels to get feedback about our level design. We even write this blog, in part, to get feedback about our process!

We use all of this feedback to help make Where Shadows Slumber a better game. That is the benefit of testing.


The Power of the POC

If you’re a game developer, and your friends and family know you’re a game developer, then there is a phenomenon I’m sure you’re quite familiar with. If not, allow me to explain.

Most people don’t understand the amount of time and effort that goes into the development of a game. Therefore, if someone thinks of a half-decent game idea, they come to you with it. If I had a dollar for every time someone has said “Jack, listen to this idea for a game – you’ll be a millionaire!”, I actually would be a millionaire.

So, you end with a lot more game ideas then you can possibly make. Some of them might actually be pretty good, but you’re just one person – how can you tell if an idea will end up working out? Do you have to just pick a concept, make the whole game, and then just hope that people like it?

This is exactly what proof of concept projects are for! Can you imagine if we had spent two years making the full game for Where Shadows Slumber, only to release it and find out that nobody enjoys shadow-based puzzles? What a waste! But spending two months working on a project that could become something big is totally worth it, even if people don’t like it.

POC

A shot from one of our earliest POCs

That’s exactly how Where Shadows Slumber started. I came up with the idea, and I immediately spent two months or so developing a POC, a very, very basic version of the game, that would just be used to tell if the game had any merit. I showed it to Frank and a few other friends, and they liked it, so we decided to make the full game. If they hadn’t liked it, then we would have scrapped the project. I would have wasted two months, but I would have known that it was a project not worth pursuing, without wasting even more time.


Testing Design

In my opinion, the hardest part of game development is design. Programming is easy enough, once you know what you want to program. Art, on the other hand, would be the hardest part if it weren’t for Frank, but that’s just because I’m bad at art.

Once you know what you want to make, programming and art are mostly execution on that vision. Coming up with that vision is the hard part. What is your game mechanic? How does it work? How do you explain how it works to the player? What does your difficulty curve look like? On and on, there are thousands of questions like this that you can apply to game design, and they’re all important.

This is one of the main reasons we try to get as many people as possible to play our game. There are certain realizations about design that you can only get by showing it to a lot of people and getting feedback. We never would have discovered how much people dislike ‘randomness’, which is something that could have played a major part in our game, if we hadn’t shown it to a bunch of people.

But even once you’ve made all of the decisions regarding your game’s mechanics, you still need that feedback on the last giant piece of the game design puzzle: level design. If you have an awesome mechanic, but your levels are boring and easy, or way too hard, nobody’s gonna want to play.

In order to prevent this, we’re doing some alpha testing! We have all of the levels designed, and we have all of the mechanics half-implemented, so we’re sending out test levels!

Crumble

This is what it would look like if I were in charge of the art…

These levels are ugly – but we’re not testing the art! These levels are buggy – but we’re not testing the code! These levels just might be poorly-designed, and that’s what we want to know. Our testers will tell us what they like and don’t like about these levels, and we will update them accordingly.

The important part of this process is that it’s happening as early as possible. If we sent out fully-complete levels, and then we had to change one, we would end up either scrapping the art, which is a huge waste, or trying to change the level without changing the art, which just makes it look weird. That’s why these levels look all dull – it’s all part of the plan!


Testing Philosophy

The last thing you want is to work hard for two years on a project, only to release it and find that it’s not as great as you thought it was. In particular, no matter how great you think it is, your audience might not enjoy it. While there will always be people that don’t like your game, it’s important to make sure that your target audience does like it. And how do you ensure that will happen? Testing!

It’s not a great experience to hear someone say they don’t like your game, and it’s perfectly natural to shy away from that. However, hearing that from a dozen people and still having time to make changes is a whole lot better than hearing it from a thousand people after you’ve already released the game.

Whether it be unit tests (small tests to make sure that one part of your code works) or beta testing (sending an almost-complete game out to fans to look for small bugs and last-minute fixes), testing is an important part of development. Don’t get caught up in your own little game-dev world; make sure you find out what the people want!

As always, let us know if you have any questions or comments about testing (or anything else)! You can always find out more about our game at WhereShadowsSlumber.com, find us on Twitter (@GameRevenant), Facebook, itch.io, or Twitch, and feel free to email us directly with any questions or feedback at contact@GameRevenant.com.


= = = = = = = = = = = = = = = = = = = = = = = = = = = = = = = = = = = =

Jack Kelly is the head developer and designer for Where Shadows Slumber.