State of the Art – June 2018

Welcome to State Of The Art, June 2018 edition! This monthly progress report is written by Frank DiCola and is focused entirely on how the game’s visuals have improved in the past month.

I’m going to try something new this month. Before we hit the spoiler part of the article, I’ll give you a brief update about the state of the art, and how much work is remaining on the aesthetic side of things. There will be no pictures, GIFs, videos, or bulleted lists, so don’t worry about seeing spoilers! (Just don’t scroll down too fast. You’ve been warned!)

Missed last month’s State of the Art? The May edition is right here.


Spoiler-Free Progress Report

When May began, I had just polished Worlds 5 and 6. However, all of the Levels in the game were in a “toss-up” state. There was no indication as to whether Jack could begin optimizing them. That’s a slow process that he doesn’t want to do twice, so we needed some way of determining which ones I was finished working on. (Optimized Levels are difficult to edit, sacrificing changeability for faster runtimes) As I turned my attention to animation, I realized only 2 of the game’s 10 cutscenes were animated, and none of them had any audio. I tried a weird system of putting audio cues in manually through Unity Events, but that failed miserably. World 7, the game’s final set of Levels, still looked like it did during the prototype phase. My initial artwork on those Levels came across as dated and I really disliked the look. Even worse, the toolkit I established for that World last year didn’t seem like it was going to provide a good foundation. It used way too many polys and didn’t account for the specific nature of many of this World’s puzzles. The outlook was bleak.

As of June 5th, 5 out of the game’s 10 cutscenes have been fully animated. That includes body animations, facial animations, effects, cues, intros, and outros. The SFX for those cutscenes was created independently by our audio dream team (Alba S. Torremocha and Noah Kellman), which means I was able to focus my attention elsewhere during the past four weeks. I greatly improved the World 7 toolkit and reduced the poly count while increasing the quality. That World has a really distinct look to it, one that I think is appropriate for the end of our journey together. I polished 2 of the 5 Levels in World 7, meaning I won’t return to them and I believe they are final game quality. (It also means they are ready for the last coat of audio paint before Jack’s final stamp-of-approval.) Speaking of which, we solved our “toss-up” problem by creating an online doc where I can label a Level “Gold” or “Needs Polish.” If a Level is Gold, it has my stamp of approval. Obviously, I want to get through as many of those as possible because I’ve already done a ton of work on those Levels and I don’t want to neglect the work that remains undone. This month, I “gold-stamped” Worlds 0, 1, and 2.

What’s next: To finish this game, I’ll need to animate five more cutscenes, polish three more Levels, create footprint effects for four more Worlds, and test every Level in the game on multiple iOS devices. That’s a lot of work! I’m going chonologically, so the cutscenes, footprints, and Levels remaining are all in the later half of the game. That will be my goal this month.

You’re all caught up. Now, if you want a sneak peek at some of the artwork I did this month, read on… but beware of game spoilers!


SPOILER WARNING: The rest of this article contains screenshots, GIFs and videos of later sections of the game. If you want to experience them in all their majesty for the first time on your mobile device when the game launches, don’t read on!


World-2-Footsteps.gif

Obe Leaves Tiny Footprints Behind Him!

Let’s start with something fun that isn’t even much of a spoiler – Obe leaves tiny footprints behind him when he walks! On certain Worlds, when the terrain calls for it, we generate a tiny mesh and a particle burst where Obe’s foot lands. This mesh disappears over time, giving the illusion that Obe is squashing through mud or snow. If there are other characters in the scene, they leave footprints too. We don’t do it all the time though, because any effect can be taken too far. Footprints appear for the first time chronologically in Level 2-1, “Docks”, which you can see in the GIF above.

I know what you’re probably thinking: “you guys have an entire game to finish and you’re focusing on this insignificant detail!?” However, that is entirely the point of the polish phase! Now is the time to work on tiny details that will charm players and get them Tweeting & Instagramming about our game.

You see, humans are funny creatures. We tend to take a lot for granted, and make a big deal out of the smallest things. There’s so much we expect from games as a baseline that I think our enjoyment purely comes from moments where game developers go “above and beyond.” This is anecdotal, but my Twitter feed is always filled with game developers and fans who find tiny insignificant things in video games and then breathlessly announce “THIS IS WHY <game> IS THE BEST GAME EVER CREATED IN <current year>!!” My personal belief is that players gain a sense of pride and attachment when they find something in a game that they believe no one else has noticed yet. Hence, if you add in a lot of small details, you’ll create a lot of little moments in your game that create a bond between the player and your product.


Cutscene-Animation

Five Cutscenes Are Now Complete!

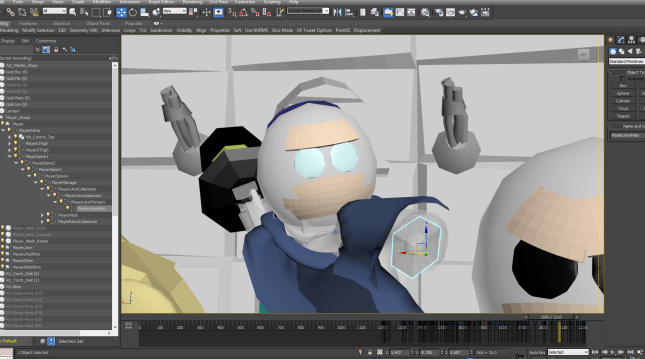
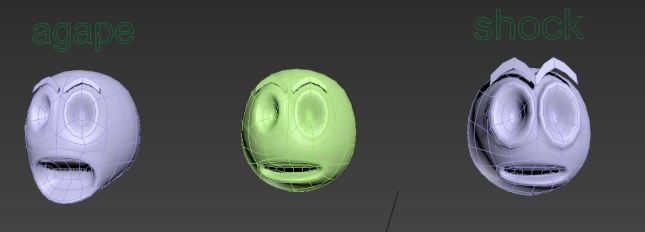
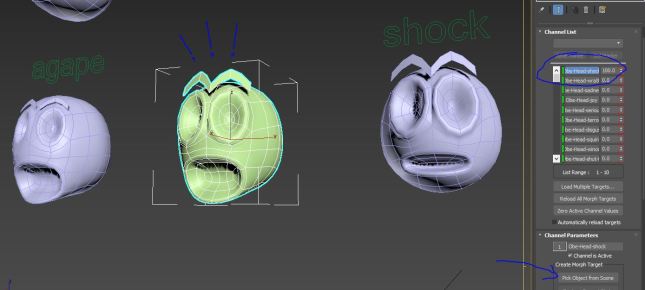
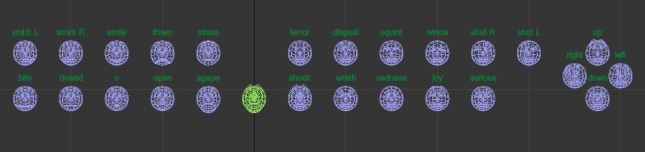
I cannot share all of the full video files of the game’s cutscenes with you yet, since five of them have been animated but none of them have sound. Even if they were done, I don’t think I’d want the solo cutscene videos out on the Internet like that. However, there are some things I can show you just to prove that I haven’t been goofing off all month long.

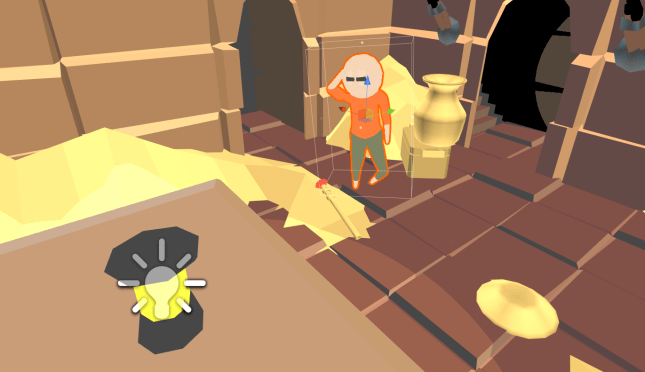
Let’s begin with a treat! Here is the game’s second cutscene, which happens just three Levels into Where Shadows Slumber. If you played a beta build at an event recently, you probably remember it as the annoying cutscene you couldn’t skip. (I’m working on that!) Obe has been thrown into a jail cell and his lantern has been taken from him. Alba and Noah sent it back to us with a first-draft of the audio dub, and it’s great:

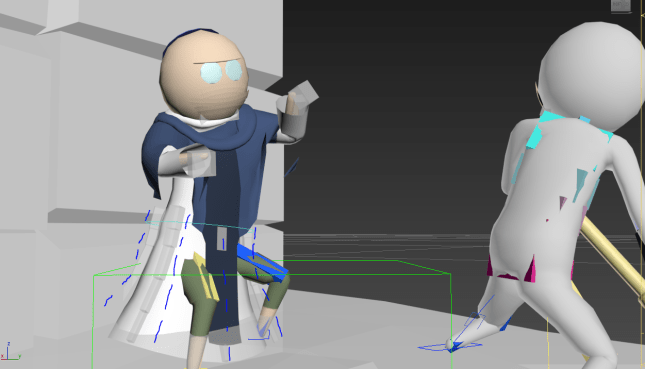
I’m so excited to see what the other cutscenes are like with audio! Tomorrow I’ll be doing a recording session with them to get some voices into the audio mix as well. We’ll never record a word of English dialogue, but our characters can still make funny faux-speech noises and grunts. Since the rest of the cutscenes have no audio, here’s some short GIFs of the animations in action to tide you over:

Cutscene-Short-Wardens.gif

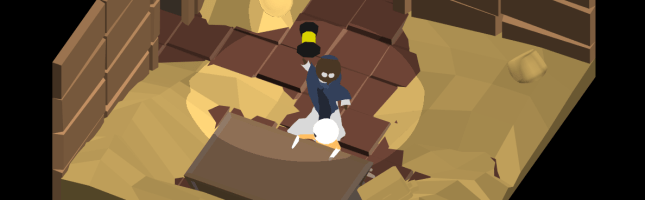
Obe “meets” the Wardens in a bad neighborhood of the Forest…

Cutscene-Short-Lion.gif

He’s trapped! It was a door the whole time!

Cutscene-Short-Wolf.gif

Obe is waylaid as Christopher Cross’ “Sailing” plays in the background…

Cutscene-Short-Beach.gif

Waking up on a random beach? We’ve all been there.

That’s enough sneak peeks for you! I can’t show you the full cutscenes just yet, can I? There has to be something left for you once you buy the game…

Next, let’s discuss the World polish I did this month!


Paradise-Header.png

Welcome To Paradise

Long-time readers of this blog will recall that over a year ago I expressed an interest in modeling an entire game World after the architecture of Bermuda. I won’t go into the details, since I wrote a whole blog post about it, but you should read that and come back here!

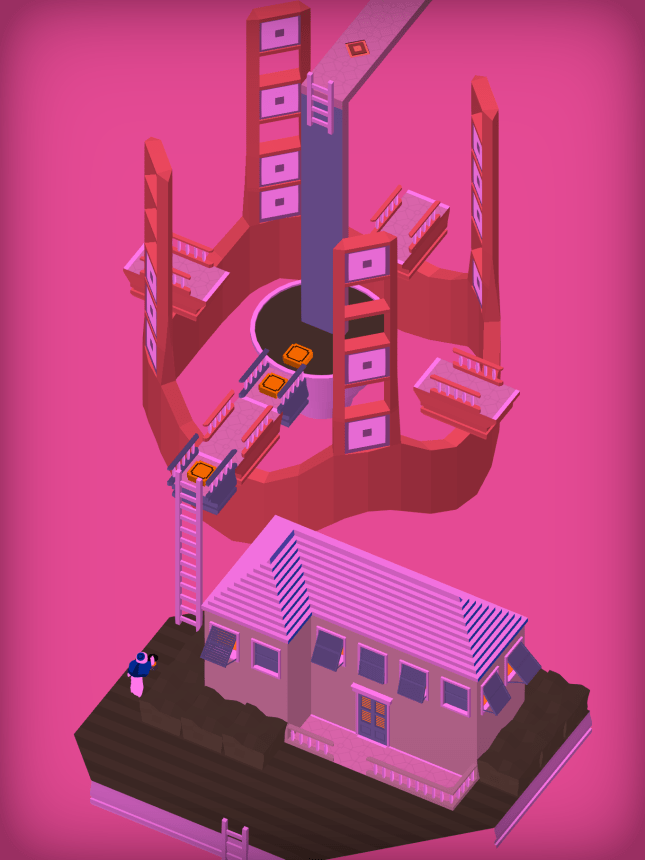
As I mentioned above in the progress report, I wasn’t crazy about how this toolkit looked when I first created it. But now I think it looks fantastic! Check out the before-and-after comparison of Level 7-1, “Ladder”, below. The first image (with the pink background) is how the Level looked up until last week. The sky was loud yet flat, the buttons looked repetitive, the house had no style, and the grass was way too dark. I didn’t even complete the ridges on the ends of this floating island! Speaking of which, why are these islands even floating?!

7-1-Old

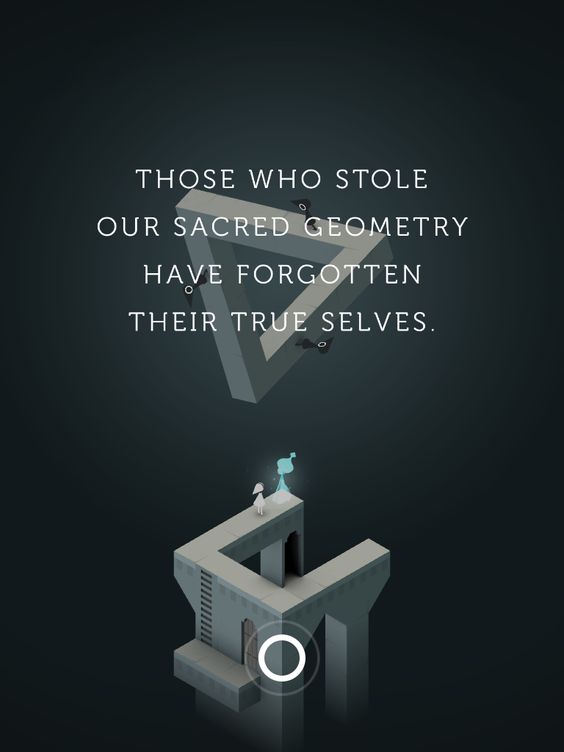
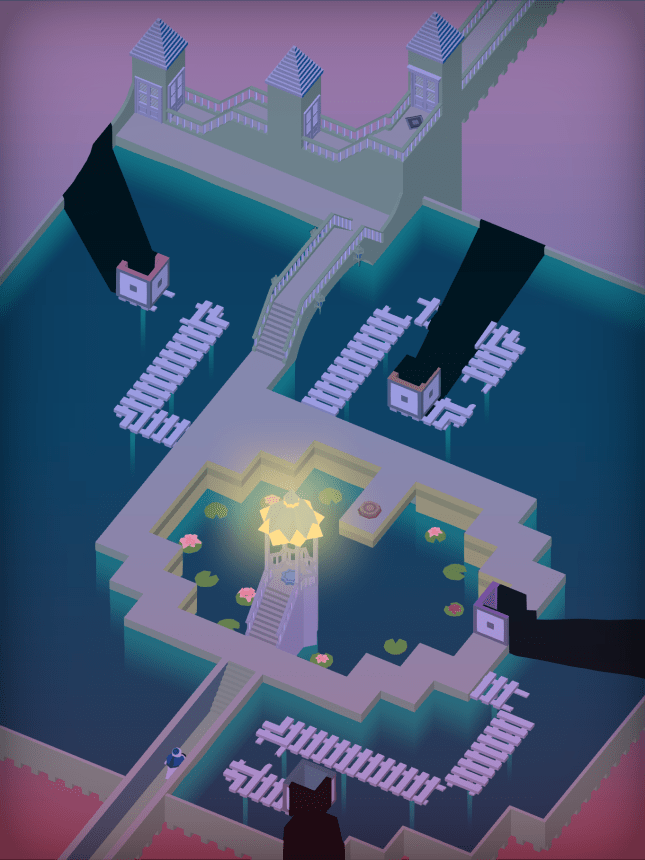
The picture below is a polished version created using modular pieces, hyper-specific artwork, and some new cool effects specific to this Level. The gradient background and fun pastel colors pay a nice homage to our muse, Monument Valley, while the window lights seem to pop off the screen. We get a real sense that Obe has come to this place in the dead of night, as he ascends ever higher.

7-1-Ladder

I’m not as sold on the next image, which is from Level 7-2, “Pond.” It’s always tough to tell when I’m being properly restrained, and when I’m just being lazy. Does this Level have enough going on? It seems like there is a lot of dead space. And yet, due to the constraints of the puzzle, this is not a Level I can go totally crazy with. I actually tried that once and I completely broke the Level and Jack had to put it back together. Whoops!


7-2-Feedback.png

I hope this looks like a peaceful pond, and not a run-down YMCA swimming pool. This is a really cool Level, so I want to do it justice. Please leave a comment below if you want to help me improve the artwork for this Level! I really do check your feedback and I find it helpful to have outside input. After looking at these Levels for so long, I begin to lose perspective. Help me out!


Conclusion

This month, I want to put World 7 to bed. I also want to clear the way for Jack to be able to put his golden stamp of approval on every Level. (As an added bonus, I usually find bugs whenever I’m gold-stamping Levels. The more I find now, the less stressful our final testing period will be!) If I can manage that, I’ll officially be done working on the game’s puzzles.

As for the game’s story, I won’t be able to finish every cutscene in just four weeks. I need some time for World 7 polish, and cutscenes tend to take one week each. Progress on those will be slow, because animation is tedious. The good news is, it’s very easy to put in fake cutscenes when we need to do builds. (It’s just a Unity file that says “go to the next Level in 5 seconds, this cutscene isn’t done yet!) That means we can do a lot of testing even as I work on the remaining animations.

But silver linings aside, there is still a mountain of work left to do on this game. The game is nearly complete, but my trek through animation hell is just beginning…


= = = = = = = = = = = = = = = = = = = = = = = = = = = = = = = = = = = =

We hope you enjoyed this update about the game’s artwork. Have a question about aesthetics that wasn’t mentioned here? You can find out more about our game at WhereShadowsSlumber.com, ask us on Twitter (@GameRevenant), Facebookitch.io, or Twitch, and feel free to email us directly at contact@GameRevenant.com.

Frank DiCola is the founder of Game Revenant and the artist for Where Shadows Slumber.

Inside Animation: Face Morphing

When I was showing off Where Shadows Slumber earlier this year at MAGFest 2018, one of my fellow game developers gave me a stellar compliment. As he watched the game’s second cutscene, he said “these animations are so evocative.” What he meant was that the animation was conveying a large amount of emotional detail even though the characters never speak a word. This is especially impressive considering the cutscenes don’t even have sound effects yet!

Sometimes, we only remember the one negative comment we get in a sea of compliments. But for once, a positive remark stuck with me. Evocative. If there’s one thing I can do as the animator for this game, it is to ensure that the player feels a range of emotions when they watch the game’s story unfold. But how can this be accomplished when our character is so small on the screen? More practically, how is this actually achieved using a 3D modeling studio and the Unity 3D engine?

This blog post is a quick glimpse at how I set up the facial animation rigs for the characters in Where Shadows Slumber.


3Ds

First: The Old and Stupid Way

Before I show you how I animate the faces in the current build of the game, I should show you the first way I tried it back when we were creating a Demo of the game. The old Obe model, shown above, had a perfect sphere for a head. In the image above, it’s grey. Then, I put in two snowman eyeballs as flat discs (they look teal in the image above) and a mouth plane that wrapped around his ball-head (obscured above). So far, so bad – nothing can be animated here! These objects are static. His face won’t look evocative at all.

My answer was to create little patches of skin that could be moved around to simulate facial animation. Though they look peach in this image above, they would blend in 100% with his skin tone thanks to Jack’s shader. My philosophy was simple – if the skin slabs were out of the way, his eyes were open. If they blocked his eyes partially, that was a facial expression. In the image above, near the bottom-right, you can see that Obe’s unsuspecting opponent has his skin slabs set to angry because they partially block his eyes in a slanted direction. By moving the slabs around in time with the animation, facial expressions were simulated.

This was supposed to be a “quick and dirty” way of doing facial animation, but it ended up being a “takes forever and looks terrible” way of doing facial animation. I’ll never return to an amateur system like this! The silliest part is that 3DS Max has a system perfectly set up for preset facial animations called Morpher.


HeadAnimations

The Morpher Method

By spending more time modeling Obe’s head, I was able to create a flexible skull with some textures mapped onto it (black for features, white for skin) and preset animations with Morpher. This skull can be tuned to different emotions, and even combinations of emotions. Above, you can see how Obe can express a range of poses: angry, devastated, confused, joyous, blissful. Now that you’ve seen the final product above, here’s how to set up your own:

Morph-Base

Step 1: Model the base head

Spend some time crafting a base head for your character. Note that you’ll be unable to edit it once you begin Morphing, so take your time. Create flexible eyes, a mouth, a nose and ears (if your character has those) and be sure to add enough loops so they can move around later without looking jagged. This time, I gave Obe detached cartoon eyebrows so I could be more ambitious with his facial expressions.

Morph-Poses.JPG

Step 2: Duplicate the head as a Copy (not an Instance) and pose it

Now you must copy the base head and move it somewhere else in the scene. (I like to make a Game of Thrones style wall of faces.) Edit the vertices on this model into an extreme pose, such as furious anger or deep sadness. This pose will be what “100%” of this emotion looks like. Note that the vertices from the base head are going to move (morph, if you prefer) into the new positions you give them here, as well as every point in-between. Pay close attention to the topology of your model when you choose new positions for these verts, and your animations will look smooth. Above, you can see I do mouth poses and eye poses separately, so a wide open mouth (agape) can exist separately or simultaneously with wide open eyes and raised eyebrows (shock).

Morph-Combo

Step 3: Connect your pose to the base head in the Morpher modifier

The base head will have the Morpher modifier on it. None of the others need it. From the base head, you can use Pick Object From Scene to slot in certain poses as animation sliders. Then, using the arrows shown next to the poses, you can “morph” these targets from 0 to 100. 0 is going to look like your base head – 100 is going to look like 100% of the pose. If you combine two poses, as I did above, you may get weird results. But in this case, shocked eyes and a mouth agape work well together.

Morph-Gallery.JPG

Step 4: Repeat Steps 2 and 3 for every face pose you’ll need for this character

I made separate poses for Obe’s mouth (left of center) and his eyes (right of center). The yellow shape in the center is his base head. I tried to do every emotion I’d need, as well as building blocks like “shut R” for the right eye being closed. One thing I didn’t need to do is detailed mouth animation for talking, since he never says anything in a real human language. He just wails in terror a lot. But if you were doing this for a regular animated film, you’d want a whole set of mouth animations for the various sounds we make with our mouths (Chuh! Puh! Quah! Teh!) I’m happy I didn’t need that, because I hate doing those.

Morph-Swag.JPG

Step 5: Animate in a Scene when it’s all ready

This massive setup time bears fruit once you begin animating. Having a flexible facial animation system is remarkable. I love this system so much, and I never have to worry about whether Obe is expressing the emotion I want. Everything is correct and his face is super easy to read, even at a distance. Here, he’s giving an “…OK” kind of look as he escapes prison early in the game’s story. Though this look is not programmed in directly, it’s a combination of four Morph Targets: left eye closed, right eye closed, mouth closed, and “serious.” That’s the beauty of working with Morpher!


If you’re building your own facial animation system, be warned that it’s a lot of work. However, it will pay off in the end. Good luck making your animations evocative! Feel free to ask me any questions in the comments, over email, or on Twitter. I’m always eager to help. Happy blending, everyone!


= = = = = = = = = = = = = = = = = = = = = = = = = = = = = = = = = = = =

We hope you enjoyed this technical look at the systems behind the game’s artwork. You can find out more about our game at WhereShadowsSlumber.com, ask us on Twitter (@GameRevenant), Facebookitch.io, or Twitch, and feel free to email us directly at contact@GameRevenant.com.

Frank DiCola is the founder of Game Revenant and the artist for Where Shadows Slumber.

Art Spotlight: Cutscenes, Part II

I’m happy to report that as of today, the demo’s final cutscene is complete. This signals the end of an era – we won’t be updating the demo much more after this. You’ll be able to see the cutscene when you beat Level 9, right before we roll the credits. The next time we update the demo will be when we add language support for multiple regions – and we’re only doing that so we have some practice before we do it for real in the final game.

You can watch the cutscene below, using this YouTube link. Forgive the resolution, but remember – this will be playing in portrait mode on phones and tablets. It’s not meant for a wide screen like your computer.


I suggest you watch it before reading the rest of this blog post! It’s 90 seconds long and includes sound, so get your headphones. It may be “safe for work”, depending on where you work I guess… more on that in the next section.


M

Why Is The Demo Rated “M” on Google Play?

You’re looking at it. The story of Where Shadows Slumber is rather grim, and includes some violent imagery. For this reason, I chose to give the game’s demo an M rating when I uploaded it to Google Play. It’s entirely possible that I overshot things. Perhaps this is more of a “T” level of violence, or possibly even “E” for cartoon violence. I’d rather err on the side of caution. We took a chance with Apple by going for 9+ under the label “Infrequent / Mild Horror / Fear Themes”.

This is a bold step Jack and I have taken, and it remains to be seen whether or not it pays off. Many fans have told us that their young children (4 to 9 years of age) really enjoyed playing the demo. We may alienate those users by having such violent story elements in the game. It’s possible that the final game will include a Safe Mode where all of the game’s movies are instantly skipped without alerting the player. Or maybe we’re being too cautious.

The reception we get to this cutscene will greatly impact the game’s final story. Right now it’s a bit violent, with few hopeful moments along the way. If an official from Apple or Google warns us that this will turn off large groups of users, you may see a more sanitized version of this story appear next year when we release the game. My hope is that we actually attract people by giving them a narrative with teeth that tells a meaningful, adult story. Time will tell if I am wrong!


Cloth

When you examine the edges on the skirt, it becomes clear how it can’t deform properly.

This Cutscene: What Went Wrong

Many close friends of the developers have asked us why we bothered to make this cutscene at all. As I stated in Part I of this series, this was a huge endeavor that required over 40 man-hours to complete, over a span of a few weeks. Since it will not be included in the final game, why spend all that time on it? Most players will never even watch this cutscene, and it is only tangentially related to the final game.

I’ll tell you why – it’s because it was a darn good learning experience, that’s why! The process of making this cutscene was grueling, and it showed me a few ways I could improve my process in the future. Since we want the final game to have somewhere around 16 cutscenes, it’s important to work efficiently. Otherwise, you can expect that number to drop to about 3. Without further ado, here’s three things that I could do better in the future:

Cloth Simulation: The protagonist is wearing two robes. One is a white cassock that has sleeves and a skirt. The other is a blue priestly-looking mantle. For the most part, this cloth is controlled by following the character’s bones. That is, when his right arm moves, his right sleeve goes along for the ride. But his skirt is controlled by 30 separate bones, which is stupid. I hate that I built him that way, and I have resolved to change him for the final game. I’d much rather have 3DS Max simulate the skirt as cloth, and then bring that animation into Unity. I’ll sacrifice control, but I’ll gain time. It’s worth it!

Footstep Audio: Most of the effort that went into recording sound was spent creating the sound of footsteps. I’m not really pleased with how they came out, because they are very loud and a bit too prominent. Regardless, it struck me that I ought to be able to automatically generate these “footfalls”. Jack set up a system to do this in the game itself, so we could have done it in the cutscene with different parameters. Alas, I only just thought of it, so I spent a ton of time painstakingly matching footstep sounds with the animations on screen. In general, having an audio expert who is a part of the team (and receives a cut of the game’s proceeds, or some kind of salary) would save a lot of time.

Character Rigging: This is kind of related to the cloth comment above, but it’s worth mentioning that these characters were measured and found wanting once I really began animating them. Their left arm broke and began bending oddly. Their shin bones contorted out of proportion. Their faces are weird, ranging from expressionless to cartoonish. These things are all my fault, and I need to retrain myself in 3D rigging before I redo the character model for the final game.


sddefault

If you’re investing in a sound recorder, the Zoom H4n Pro is a good choice for indies.

This Cutscene: Strategies That Paid Off

It wasn’t all bad, though! There were some strategies I employed that paid off in the end. Either they worked better than expected, or they allowed me to create a passable product so I could move on from this. 10 / 10 would do again:

Zoom Recorder: I recorded the sound for this demo cutscene using a Zoom H4n Pro field recorder. It’s a lightweight microphone the size of an old Gameboy that I used a lot in college. Now that I have my own (or rather, the company has its own) I have to say I’m quite pleased with it. If we don’t hire a dedicated sound team member, I’ll have no qualms about recording everything myself using the Zoom.

Audacity Mixer: Audacity is a free sound mixing program, and it got the job done. It has its quirks and I’d happily switch to another free program if I could find a better one. But for now, I know how to use it and it didn’t give me too much trouble. The final game’s audio will be made in Audacity unless I switch to an Adobe sound program since I’m paying for that whole suite anyway.

3DS CAT and Unity: The pipeline from 3DS Max to Unity worked as intended. I never experienced any problems getting Finale.FBX out of my animation program and into the Unity scene. This is promising, and it means 3DS Max will remain my tool of choice as we head into the final game.


Rekt

Coming To A Build Near You

I can’t exactly say when, but this cutscene will be added to the demo build at some point in the future. We’re trying not to do too much more to the demo build since it won’t make us any money and may not even guarantee future sales of the real game. Still, it should put to bed any questions people have about whether or not Where Shadows Slumber will have a story when it is released next year. It will hopefully also give us insight into how people might react to the final game’s narrative. If we see a massive spike in bad reviews right after we patch this into the demo, we’ll get the message loud and clear.

Thanks for reading this series! I hope it was an informative look behind the scenes. Feel free to send in any questions you may have – it’s possible I’ll do a third one of these at some point where I just answer questions from fans.


= = = = = = = = = = = = = = = = = = = = = = = = = = = = = = = = = = = =

Looking for something about cutscenes that wasn’t addressed? You can find out more about our game at WhereShadowsSlumber.com, ask us on Twitter (@GameRevenant), Facebook, itch.io, or Twitch, and feel free to email us directly at contact@GameRevenant.com.

Frank DiCola is the founder of Game Revenant and the artist for Where Shadows Slumber.

Art Spotlight: Cutscenes, Part I

For the past few weeks, Jack and I have been working on transitioning from the Demo Version to the Final Version of Where Shadows Slumber. One of the finishing touches I’m committed to adding to our demo is a short cutscene that plays when you beat the game. Our fans are always asking us if the game will have some kind of a story. The answer is yes, it absolutely will! But the nature of mobile entertainment and puzzle games in general dictates that we tell a certain kind of story in a certain kind of way.


860e6bef748f96c0bfd4d8d5b79626a4

Screenshot from one of Monument Valley’s cutscenes.

Why Cutscenes?

When we decided we wanted the game to have a story, we looked at other successful mobile games (see Monument Valley, above) as well as the games Jack and I usually like to play. It seemed that short cutscenes, placed directly after the player “achieved” something notable, were the best way to hold people’s attention. Jack loves listening to all of the audio books in Diablo 3, and I loved reading entire libraries in games like Morrowind and Skyrim. However, for a casual gamer, massive amounts of text can seem like an information overload. Not to mention, that creates a lot more work for our translator – which translates into a serious cost for us.

It’s also worth mentioning that mobile gamers don’t often play games with the sound on. Clearly, investing our time in fully voice-acted content wouldn’t be worth it. Who would ever hear it? When you think about it, given these constraints, we didn’t have many options.

  1. Mobile gamers can’t hear your game
  2. Casual gamers want a story, but not an epic saga
  3. Mobile gamers play the game in short bursts
  4. The more voice over work and text we have, the more we need to translate

Since the above four points are a given, we decided to have short cutscenes at the beginning and end of every World in our game to serve as end-caps. The action in each of these animated scenes will be completely wordless and textless, and tell a story through body language alone. Sound will be present, but it won’t be important. The cutscenes themselves each tell a unique piece of the story, and may even seem disconnected. This is all by design!


3Ds

3DS Max is used to animate the actors, and the file is then interpreted by Unity.

The Technology Being Used

All of the artwork in Where Shadows Slumber is done in a program called Autodesk 3DS Max. I’ve used many studios in my years as an animator, but this was one of the first I ever tried and something about it called me back.

3DS Max is used to create characters (modelling), paint them (texturing), give them bones and animation handles (rigging), and make them move around (animation).

Then, these animations play in real-time within Unity. So when you’re watching a cutscene, you’re really watching the game – not something that was rendered ahead of time as a series of images and played back like a film. It was important to me that we use Unity to its full potential, and always kept players “in the game world”.


regret

Within Unity, the actors are given color and lighting.

Process: The Inverted Cone of Cutscenes

When working on a large project like this cutscene, it’s important to work in stages and have clear checkpoints. And make no mistake, even a cutscene that is 1 minute long is a large project! I have spent close to 30 hours on it so far, and I’m not even finished. The problem with stuff like this is that if you want to change something, usually you have to undo or throw out a ton of work. It’s important to make sure that doesn’t happen, and that you start with a wide range of possibilities but eventually focus in on what the cutscene is going to be.

For some insight into how a cutscene begins wide and then narrows to completion, look at this graph:

CutsceneBlog

The further you go down the inverted cone, the more work you lose if you change something.

See the arrow – I am currently at the end stage of Principal Animation. That means the actors all have their general motions and you can tell what’s going on in the scene. But it still isn’t finished! Look at all of the other stuff that has to be done.

The reason things like cloth motion and sound come last is because, should we decide to change some of the Principal Animation, we would have to throw out all of that “detail work” anyway. So it just makes sense to save it for last and only work on it when the work at the top of the cone has been checked and locked.


skirt.PNG

The player’s cassock (the white tunic) is animated using 30 individual bones!

Regrets So Far

You don’t work on a game without having some serious regrets. Every regret I have so far regarding this process has to do with time – something I did, did poorly, or did not do, that cost me precious time and made us push our deadlines back.

Giving the character cloth robes: I love robes. I love cloth. But I foolishly decided to give our main character cloth robes that must be painstakingly controlled via spider-leg-like bone tendrils. This process is maddening, takes forever, and never looks good. I regret not using Cloth simulation, something 3DS Max provides and Unity supports.

His dumb hand bones: This is something you would never know from watching the in-game cutscene, but the main character’s hand Bone (an invisible puppet-string object) is stupid, dumb, too big, and I don’t like it. I should have made them smaller. Also I think his left arm bends the wrong way. Let’s just say I ought to re-do his entire rig.

Link To World broke everything: I used a parent-child relationship to allow the characters in the scene to hold objects (i.e. the lantern, the urn, the chest, the scepter, the bowl). This worked perfectly! Except… for some reason, the first time I set up linking on my character’s IK hand setup, it wigged out and sent his hands flying off screen for every single frame of animation I had done previously. This was clearly some kind of offset error, but I never found a good solution. I ended up reanimating his hands halfway through!

People would rather have more levels anyway: The sad truth is, this is a puzzle game. People want puzzles. (“More levels!” – The Proletariat) As much as they may say they want a story, the truth is we’ll get more mileage out of working hard on puzzles instead. It may be that the cutscene is there for a different purpose. My own ego? Winning artsy indie game awards?

Everything mentioned here made me lose time and work on this far longer than I should have, making us weeks (if not months) behind schedule for a demo that was supposed to be done already. Perfect is the enemy of good enough! Live and learn, right? That’s the beauty of working on a demo first. I now know what not to do for the final game! Let’s just hope the damage hasn’t already been done by now.


Next Blog Post

By the time I have to write Part 2 of this blog, I should be finished with the cutscene. I can show it to you in full and we’ll do a bit of a postmortem on it. I can give you the short version of the postmortem now: the cutscene is a lot of work, there’s very little payoff (I assume), and the subject matter is controversial. Nevertheless, here’s a sneak peek at it to tide you over until then…


= = = = = = = = = = = = = = = = = = = = = = = = = = = = = = = = = = = =

Interested in hearing about the game, now that you’ve peeked behind the scenes? You can find out more about our game at WhereShadowsSlumber.com, find us on Twitter (@GameRevenant), Facebook, itch.io, or Twitch, and feel free to email us directly with any questions or feedback at contact@GameRevenant.com.

Frank DiCola is the founder of Game Revenant and the artist for Where Shadows Slumber.