State of the Art – July 2018

Welcome to the State Of The Art, July 2018 edition! This monthly progress report is written by Frank DiCola and is focused entirely on how the game’s visuals have improved in the past month.

Before we reach the spoiler part of the article, I’ll give you a brief update about the state of the art, and how much work is remaining on the aesthetic side of things. There will be no pictures, GIFs, videos, or bulleted lists, so don’t worry about seeing spoilers! (Just don’t scroll down too fast. You’ve been warned!)

Missed last month’s State of the Art? The June edition is right here.


Spoiler-Free Progress Report

When June began, 5 out of 10 cutscenes were animated and World 7 was less than half complete.

As of July 3rd, 7 out of the game’s 10 cutscenes have been fully animated and World 7 is finished! (There’s a tiny amount of work remaining for these two cutscenes, but cut me some slack here) I also did something I don’t normally do and programmed the cutscenes to have a pause menu where you can skip the cutscenes. Does that count as “art?”

What’s next: Later today, I’ll finish the two cutscenes that are nearly complete. This month will then be dedicated to finishing the final 3 cutscenes and putting the finishing touches on the game’s artwork.

You’re all caught up. Now, if you want a sneak peek at some of the artwork I did this month, read on… but beware of game spoilers!


SPOILER WARNING: The rest of this article contains screenshots, GIFs and videos of later sections of the game. If you want to experience them in all their majesty for the first time on your mobile device when the game launches, don’t read on!


World-7-Header.JPG

Paradise is Complete

My work on World 7 is officially done! It took longer than I would have liked, but the Levels came out great and it will serve as a proper final sendoff for those who complete the game. Here are the full screenshots from the three Levels I had to finish:

SOTA-7-3.png

SOTA-7-4.png

SOTA-7-5.png

There will still be GitHub Issues to address in these Levels, so I’m not completely done. However, the same is true of every Level in the game at this point, so it doesn’t matter! I hope you like the look of these Levels. Since you’ve journeyed into spoiler-land, you may as well tell me what you think in the comments below!


Header-King.JPG

Two More Cutscenes Are (Nearly) Complete

Once I finished World 7 about halfway through June, I moved on to two more cutscenes. I do these chronologically, so check out last month’s blog if you’re trying to piece the story together through short GIFs. Here are some teasers from these cutscenes:


Cutscene-Short-Leopard.gif

Obe runs into an old friend on his way out of the Aqueduct…

Cutscene-Short-King.gif

“Can I interest you in a golden circle, by any chance?”

At the beginning of this month, I had a long sound recording session with Alba and Noah. You can read all about it here. The short version of the story is that we recorded voices for all of the characters that “speak” in cutscenes. (By speak, I mean “loud unintelligible grunting”) For the past month, they’ve been working on implementing those into the game, so the cutscenes I completed in May are going to have finished audio soon.


WilliamChyr.JPG

Back to Work

Sadly, this blog post reveals that I didn’t get as much done in June as I’d hoped. Because World 7 took a long time to finish, that delayed my progress on the cutscenes. Being behind schedule is a slippery slope!

As soon as I finish this post, it’s back to work finishing those two cutscenes I mentioned. I’ll record them and send them off to our audio team for scoring. Then, there are three more cutscenes that need my love – and one includes a full credits sequence that may just be too ambitious to put into the game. I’ll also need to take some time just to address the mountain of GitHub Issues that Jack logged as he played through the entire game. Some Levels require artistic changes to make the shadows look better. I can save those for later, but we’re running low on “later” – and I don’t want his progress to be stopped because I couldn’t take a break from cutscenes for an hour to read all these emails. Finally, there is a Level Select screen for World 7 with my name on it. Those tableaus are beautiful but each one takes a few hours to complete.

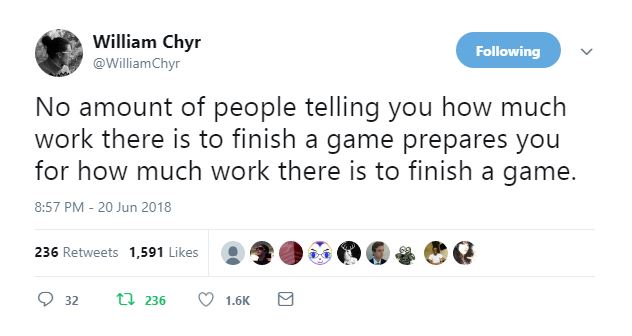
The tweet above, from William Chyr of Manifold Garden fame, is appropriate. I always expected the end of development to feel like less and less work as we neared our goal, but it’s the opposite! There is so much to do, and so little time.

Back to work!


= = = = = = = = = = = = = = = = = = = = = = = = = = = = = = = = = = = =

We hope you enjoyed this update about the game’s artwork. Have a question about aesthetics that wasn’t mentioned here? You can find out more about our game at WhereShadowsSlumber.com, ask us on Twitter (@GameRevenant), Facebookitch.io, or Twitch, and feel free to email us directly at contact@GameRevenant.com.

Frank DiCola is the founder of Game Revenant and the artist for Where Shadows Slumber.

4 Tools for Recording Your Game

Recently, a friend of ours asked us to provide him some footage of Where Shadows Slumber in action for a highlight reel he’s making. That made me realize we never blogged about the topic of recording your game. I’ve gotten pretty good at recording images and footage of the game over the past few years, so why not share my tricks? It’s just one more thing I never thought I would have to do before I started doing game development, but our experience with SkyRunner taught us a lot.

So this blog post will save you some time if you’re looking for tips: here are the programs I recommend for recording images, GIFs, and video of your game!


7-1-Ladder

Saad Khawaja’s Instant Screenshot

During the process of marketing your game, people will often ask you for a full-resolution screenshot of the game in action. To fulfill this request, you need to get the dimensions of the screen exactly right. For example, our game is made for phones in Portrait resolution. If we give someone an image that is in Landscape resolution, they’ll think the game is made for computers or game consoles instead. Getting the resolution right was really important to me, and I recognized quickly that the Microsoft Snipping Tool (more on that below) wasn’t going to give me the high quality screenshots I wanted.

After trying out a few plug-ins on the Unity Asset Store, this is the one I came away with: Saad Khawaja’s Instant Screenshot. It’s free and very easy to use. You can adjust the size of the final image, or set it to the current screen size which is super useful. You can take low quality images or blast the pixels up to an insane level. (I could probably make a banner-sized image with this tool!) Once it’s in your project, you’ll see it in the “Tools” window and after you click that it comes up like any other Unity window. Trust me, you will not regret making this tool part of your routine.


SnippingTool.JPG

Snipping Tool

This one is just for Windows users, but there’s a program installed on every Windows machine called “Snipping Tool” – have you ever used it? Find it in your Search bar and save the shortcut. I keep Snipping Tool on my hotbar! That’s how useful it is.

Above, we discussed how sometimes you really need high-resolution screenshots at the exact size of the screen. However, often I need to record segments of the game for internal use. In these situations, like if I’m logging a bug in GitHub, it’s not helpful to have such a large image. My philosophy is that the image should be short and wide with the bug in the center of the picture. This way it will fit in nicely with the text of the bug report. I generally include some kind of note where I circle the problem, or draw a funny confused face. (This probably annoys Jack, but I’m sort of hoping it softens the blow of finding another bug in some far off corner of the game)

Fortunately, you can do all of this with Snipping Tool and you don’t even need to download it! Simply click the snip button, drag across a corner of your screen, draw on it with your mouse, and copy/paste the image where desired. You don’t even need to save the image to your computer if you like to live dangerously. Make Snipping Tool your go-to for capturing bug report images, and include as many images in your bug reports as you can. It will really help your team!


Cutscene-Short-Wolf

ScreenToGIF

The image above is a GIF, and it was recorded using ScreenToGIF. The best way to explain the GIF file format is that it’s basically a digital flipbook. I may be dating myself here, but did you ever have those little Disney flipbooks as a kid where you could flip through them with your thumb and see the animation play out across a hundred tiny pages? That’s a GIF. They are all over the place, they’re great for advertising your game in motion, and the Internet loves them.

Before ScreenToGIF, I found it really difficult to make my own GIFs. I forgot what program I was using – who cares, it didn’t get the job done! Download this program for free here, and I promise you that you will not regret it. There’s a ton of settings you can tweak to get the image size, file size, and quality you want. It’s extremely user friendly. You can delete frames after you’re done recording too, which is such a nice feature. I’ve never had a problem posting these animated images to Facebook or Twitter. I’m not being paid off to say this: use ScreenToGIF!


Open Broadcaster Software

I wish I had a better option for recording video of our game, to be frank with you. (Note: I am always Frank with you, dear reader.) This program Open Broadcaster Software (OBS) was the main way I streamed on Twitch a while back when I used to do that. I then realized that it didn’t just stream your image to the Internet – you could also just record footage and save it to your computer. Neat!

Download OBS for free here. It’s not bad, but it’s not perfect either. It can record footage and capture audio too, which is helpful for progress updates like the image above. However, getting the screen resolution just right is pretty difficult. According to Alba and Noah’s finely trained ears, it does not do a good job recording sound from the computer either. But I’m willing to admit that could just be my fault… there are a ton of settings to configure, and I have no idea what I’m doing!

It doesn’t do your editing for you either: I recommend Adobe Premiere or Final Cut. Sadly, I know of no good free editing tools! You’re on your own, I’m afraid.


That’s all for now, folks. I hope this saves you a few days of frantic searching, downloading, and deleting. Thanks for reading, and happy recording!


= = = = = = = = = = = = = = = = = = = = = = = = = = = = = = = = = = = =

What programs do you use? Do you like my suggestions? Feel free to leave a comment below! You can find out more about our game at WhereShadowsSlumber.com, ask us on Twitter (@GameRevenant), Facebookitch.io, or Twitch, and feel free to email us directly at contact@GameRevenant.com.

Frank DiCola is the founder of Game Revenant and the artist for Where Shadows Slumber.

Inside Animation: The Process

As I descend further into the depths of animation Hell, I thought it would be good to expose my animation process to the world. At this stage of the project, I’ve completed half of the cutscenes in the game. I’m able to tackle one cutscene every week. I have a good sense of the workflow and I’m getting “in-the-zone”, so I feel ready to talk about the steps I take to bring these scenes to life.

Long time readers of this blog (all three of you) may remember the first time I did this. Last year, when I was still animating the Demo, I wrote two articles about my process. Here are the links to that old article, parts one and two. Enough has changed since then that it warrants a new piece.

( NOTE: I won’t go into detail about how I animate the character’s faces, since last week’s blog was a deep dive into that system. Feel free to check that out. )

Now, how do we make the cutscenes in Where Shadows Slumber? To make this process more concrete, I’m going to focus on a relatively innocuous cutscene that I just got finished animating this week called Beach.
 

Cutscene-Writing.jpg

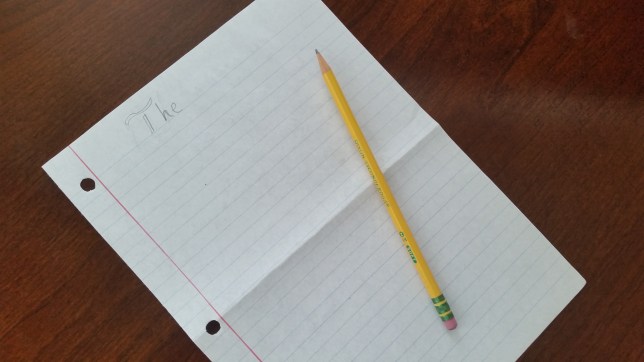
Step 1: Write A Story

You may not have expected this to be the first step on our journey, but it is! Writing is the most important step, by far. Before any work begins on a cutscene, Jack and I have to agree on the game’s story and how it will be told to the player during the game. This process took place a long time ago, at the beginning of 2017, when we locked ourselves in a room and did not emerge until the game’s narrative was pinned down.

Cutscene-Script-Beach

Before we named the character, “Grongus” served as a funny temporary name.

The original script was revised two times (officially) with some extra cuts happening unofficially in conversations between the two of us. Our original idea was to have a lot of cutscenes – I think 15 or 16 cutscenes in total – in the entire game. Since there are 8 Worlds, we wanted an intro cutscene to each World and a “finale” cutscene after the player completed all the cutscenes in that World. I agreed to this not only because I loved animation, but also because I vastly underestimated the scope of the work.

However, we eventually decided to eliminate a lot of the intro scenes. They weren’t really necessary, and it was jarring for players to watch two cutscenes in a row (a finale for one World, and an intro to the next) when they really wanted to get back to the gameplay. We only kept intro scenes for moments where the Player would be genuinely confused without them. The best example is the cutscene called Escape which takes place very early in the game. Prior to this cutscene, Obe is captured by human-like animals in a finale cutscene, and his Lantern is taken. In the very next Level, he’s freely walking around a volcanic prison with his Lantern in hand. Without a cutscene like Escape, players might wonder what happened to the animals, how the Lantern returned, and why Obe is not still in some kind of cell.

Cutscene-Script-River.JPG

Not only was this intro cut from the game, but this World’s puzzles don’t even operate the way we indicate in this script. This is why it’s good to leave cutscenes for the very end of the project!

Therefore, the Beach scene is a bit of a relic as far as cutscenes go. It’s one of just two intro cutscenes left in the game, taking place at the beginning of World 3, the Aqueduct. I felt it was important to show the transition between the River World and the Aqueduct World because they are quite different, and the River finale doesn’t hint at the Aqueduct in the slightest bit.

Here’s the short version: The scripting process is important, because if we can’t agree on whether or not a cutscene should be in the game, I can’t go forward and spend 40 hours creating it!


Cutscene-Sketch-Header.jpg

Step 2: Sketch the Scene

Execution begins with sketching the scene on pen and paper. There is a long gap between the writing process and the actual execution of the cutscene. For reference, I began this cutscene 1 week ago on May 22nd 2018, but the story was written in January of 2017. That’s over a year! As I mentioned above, one reason for this is because puzzles are more important to the game than cutscenes are. Puzzles get top priority! Also, since edits to the script happen sporadically as the game evolves and our scope shrinks, it’s good to sit on the script for a while. That’s why I’m doing cutscenes last.

There’s one more good reason, though! Since cutscenes happen after the game’s art has been completed, the sketching process is a lot easier. Most of the game’s artwork is done using a modular set of puzzle-piece 3D models that can be arranged along a grid to form pathways, bridges and obstacles. I’ve also created a bunch of materials for each World. That means when it’s time to lay out how a cutscene is going to look, I have a wealth of building blocks to work with. Really, all I need to do is draw a few pictures to determine the camera’s position, and I’m good to go.

Cutscene-Sketch

When I sketch a scene, I’m trying to make it look just like the puzzles. My goal for cutscenes is that you never even feel like you’ve left the game. The camera is in the same position and rarely moves, just like the game. I use the same models, colors, camera effects, and even some ambient audio, to keep that feeling of similarity. So when I draw a picture of the scene, I’m trying to get everything in one shot. I need it to work in portrait mode on an iPhone, with room for superfluous art on the sides that only iPad users can see.

That’s why for Beach I composed the scene with the outlet pipe near the top of the scene. I know Obe is going to wake up, walk to it, and climb in. Arranging the scene this way avoids a messy camera transition, and lets us focus on the stillness of the moment.

With a good picture to work from, we’re ready to set things up in Unity 3D.



BurnedLaptop


Step 3: The Unity Smoke Test

You were probably expecting Step 3 to be “model everything in the scene” or “begin animation” – but I don’t dive into that right away. I’ve gotten into the habit of doing a smoke test whenever possible, before beginning a large amount of work. This is an old phrase from computer programming that refers to plugging in a machine and seeing if it starts to smoke, or light on fire. It’s also known as a sanity test.

As the picture above indicates, the modern version of a smoke test is when I douse my computer in gasoline, light it on fire, change my name and move to Mexico. (Wait, that’s not a smoke test. That’s Operation: Secret Grongus. Whoops! Jack, please remind me to delete this paragraph before I hit Publish)

The modern version of a smoke test is when you intentionally do placeholder work just so you can test it and see if something is going to function correctly. After all, if it doesn’t work now, it won’t magically work later. It’s especially important when making a transition from one tool (3DSMax) to another (Unity). The game’s cutscenes will be animated in 3DSMax, but they’ll be viewed by the player in a build of the game generated by Unity. We need to make sure that pipeline works before we dedicate 40 hours of work to something.

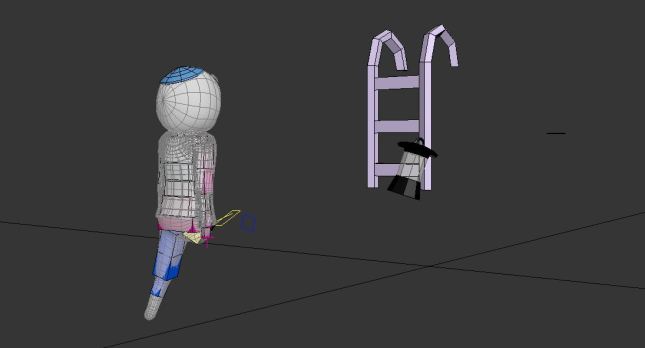
First, I create a scene in 3DSMax to work with. I import (3DSMax calls it “merging”) Obe’s character model, and the models of any other characters that are in the cutscene, into the file. I also merge in a few models that I know I will need. For example, in Beach, I know I need to use my ladder pieces so Obe can climb into the pipe.
Cutscene-SmokeTest.JPG

Will Obe, his Lantern, and my modular ladder make it into Unity properly?

I give Obe some basic placeholder animations. Really, it’s just a few frames that will all be deleted later. I make Obe wave his hands, move in a T-pose, do jumping jacks, or something silly. My goal is to make sure the animations are properly translating over to Unity. I do a similar process for objects in the scene and other characters. Obe is animated separately from them because I’m using the same Unity prefab that is used in the real game. This adds another step, but it’s worth it in case there are crucial last-minute changes to his prefab. Along with that, there’s a lot of little things to do – Animation Controllers for each FBX file, setup in the scene, camera positioning, light adjustments, and much more. Anything could go wrong, so I’d rather find out before I’ve done a few grueling hours of animation.

Cutscene-SmokeTest-2.JPG

Every cutscene needs its own Unity scene, FBX files for Obe and the rest of the cutscene, and Animation Controllers for Obe and the rest of the cutscene.

I have a small checklist of things I go down:

  • Can I animate Obe?
  • Can I animate his Lantern separately from him?
  • Can I animate his Lantern if he’s holding it and it follows his hand?
  • Are Obe’s hands, feet, and pelvis “Linked to World”?
  • Can I animate other characters?
  • Can I animate other characters holding objects?
  • Can I animate objects on their own?
  • Do other characters require their body parts to be “Linked to World”?
  • Is there a light? Is that light attached to the Lantern?
  • Is the Lantern flickering properly?
  • Does the camera need to be re-positioned, or zoomed in?

When I’m confident that Obe’s animations and the animations of everything else in the cutscene are working well, I can begin modeling the scene in earnest. Now I’ve made sure there won’t be any surprises during the next step.


Cutscene-Model-3DSMax.JPG

Step 4: Model Static Objects

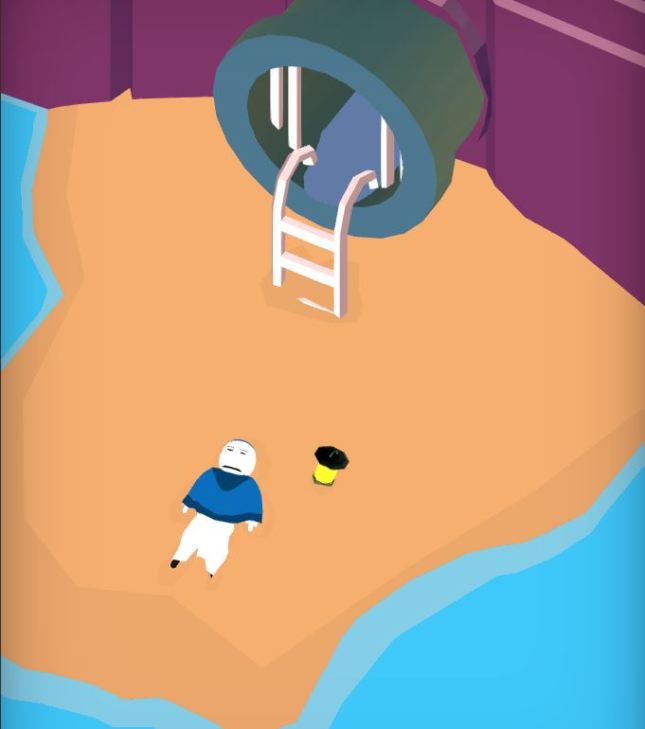
We’re ready to bring my ink sketch to life by creating the scene in 3DSMax. This is done by using modular building blocks wherever possible, and also creating new 3D models. Beach is a bit of a hybrid in this regard. The ladder, for example, is the same model and material used throughout the game whenever Obe climbs a ladder during a puzzle. The water is the same rig we use during Levels, albeit with a special material. But other specific objects, like the sandy beach, the wall, and the outlet pipe are unique to this scene. I gave up the strictly modular approach a little while ago, and I think the game is better for it. (Above, the scene in 3DSMax. Below, the same scene in Unity.)
Cutscene-Model-Unity

Now that the models are in place, and nothing is going to change, I can go forward with confidence. I place Obe in an initial pose that matches the terrain, and begin animating the scene by hand.


Cutscene-Animation.JPG

Step 5: Keyframe Animation

Recently, when I was at PAX East 2018, someone asked me if the cutscenes in our game were animated using motion capture technology. I took this as a compliment, because I think most people assume motion capture animations are an indicator of high quality. Thanks, random person!

For those unfamiliar with motion capture, think of the character Gollum in Peter Jackson’s Lord of the Rings trilogy. Gollum was animated in 3D, but not by hand – rather, the actor Andy Serkis dressed up in a silly motion capture suit and performed the role himself. Later, computer imagery was placed on top of the scene using data captured from his performance. This technology has also been used to great effect in the Uncharted series of games. As it grows in popularity, there are boundless examples to use. I can’t name them all!

However, that is not how animations are created for Where Shadows Slumber.

Motion capture is the proper tool to use when your resulting animation is intended to be life-like, gritty, and serious. Characters like Joel and Ellie from The Last of Us work well because they are intended to be portraits of real people, so it makes sense to have actors play them. Motion capture also requires a financial investment that only AAA studios can afford. If you’re using motion capture, that means you’re paying actors some money, purchasing a large studio room to perform in, purchasing high-speed cameras, and purchasing (or creating) software to bring it from the stage into the virtual world. We don’t have the resources to afford that, and I don’t want to work that way anyway!

Cutscene-Animation-Frames.png

By setting key frames at 600 (Obe takes a step) and 605 (Obe slips a bit in the uneven sand) the trivial frames between (601, 602, 603, 604) are filled in by the computer program.

Animation for Where Shadows Slumber is done the old fashioned way – by mouse-and-click keyframe setting. I’m fairly certain Pixar does this as well, albeit with more complex tools than the 3DSMax Animation Timeline. If you’ve ever seen a documentary on how Walt Disney created those first frames of Mickey Mouse by hand on cell sheets, you get the idea – the lead animator sets a pose for one period of time, and then sets a different pose for a different period of time. His subordinates fill in the gaps, and the result is the illusion of animation.

I don’t have any subordinates, so 3DSMax fills in the gaps for me. Sometimes I work with it, and sometimes I have to fight it because it filled in the gaps wrong. You need a lot of key-frames, but animation frames are just a fraction of a second ( 1/30th a second, in our game ). That means an hour of work may get you just 3 quick seconds of animation. The process is painstaking, and easily takes the longest amount of time in the cutscene creation process. Beach, a relatively simple 50 second cutscene, required 7.5 hours of animation to complete. The previous cutscene, Wolf, which is a very involved fight scene that lasts 100 seconds, required 48.5 hours of animation!


Cutscene-Footprints

Step 6: Special Effects

We’re not even close to done yet. Animating the characters in a scene is not enough to bring it to life! Every cutscene needs some kind of special effects, whether it’s footprints in the sand or the drip-drip-drip of a leaky pipe. This never takes as long as actual animation, but it can still be a painstaking process. For example, in the Wolf scene I mentioned above, every time an object fell into the water I had to trigger a particle burst to make it seem like the objects were splashing. That was as fun as it sounds!

To achieve my special effects, I wrote a script called Cutscene Manager. This thing will fire off effects based on the time of the animation, and I save it only for things I can’t animate by hand. Here’s two examples to show you the difference:

Example 1: Footprints in the sand

These footprints can be animated by hand, so I don’t need to use my script. Notice how they appear after Obe touches his feet to the ground – what’s happening here? Well, they are actually just hiding under the sand! I triggered their animations using keyframes, just like anything else in the scene. Above, you can see one that I have selected that is still burrowed under the ground, waiting to rise up.

Example 2: Obe’s Lantern light grows, and then shrinks

We use the solid color black a lot in this game. It represents total darkness, which makes it handy for scene transitions. Every Level and cutscene begins with the world in total darkness, and then a light grows somewhere and the animation begins. I think this helps focus the attention of the player, and it makes transitions less jarring. However, since Lights are a Unity component, their Range values can’t be animated in 3DS Max. 3DS Max has no idea they even exist! Instead, my Cutscene Manager script knows to change the Range of a specific Light at a specific speed at a specific point in the animation. It may seem like a crude solution, but it’s the best we came up with. At the end of the scene, the Light gets another trigger to shrink down to zero – pitch black.

You can see why special effects necessarily need to come after principal animation. So many of these things require specific timing! If the underlying animation changes, they’d have to change, too. It’s better just to wait.


Step 7: Recording for Alba and Noah

Recording the cutscene is my final step, although the cutscene is not done yet. Using OBS, I record my screen with the animation playing. I mute the sound in the game, and I talk during the cutscene to tell our audio engineers what is happening. Some things are obvious, and I don’t need to say them (e.g. he’s walking in sand, which sounds like the sound of someone walking in sand). Other times, a noise comes from off-screen and has no visual representation. Without my direction, Alba and Noah couldn’t possibly guess at what is happening in the scene. My recording is set to be the exact same time-frame that it will be in the game, which means they can “score” this video as if it was a short film. From the work they’ve done so far on earlier cutscenes, I can tell the cutscene audio is going to be incredible.

I briefly flirted with the idea of using a high-quality recording of the cutscene in the game, instead of having people view the cutscenes in real-time. However, I don’t trust Unity’s ability to play videos across multiple iOS devices and countless Android platforms. I also wanted to avoid including 10 large MP4 files into the game’s databanks, for fear it would clog up the game. The last reason is that our final cutscene transitions seamlessly into the credits, which need to be translated into multiple languages. This would result in 15 different movie files! I prefer to have that done on the fly using Jack’s JSON file setup.

Once Alba and Noah score the cutscene, I’ll put that file into the game and the audio will play in-sync with the animation, all in real time! Players can pause the cutscene from a top menu, go to the level select screen, skip the cutscene, or resume the animation seamlessly.


I don’t exactly know how Alba and Noah score these cutscenes, so I’ll leave that for another blog post. I invite them to share their knowledge with you, dear readers, whenever they feel the desire to do so. (Maybe I’ll interview them about it?)

That’s all for now. I need to go back to the animation mines and make more cutscenes… I’ll see you back here next Tuesday for the June State of the Art. Don’t miss it!


= = = = = = = = = = = = = = = = = = = = = = = = = = = = = = = = = = = =

We hope you enjoyed this look at the cutscene animation process. You can find out more about our game at WhereShadowsSlumber.com, ask us on Twitter (@GameRevenant), Facebookitch.io, or Twitch, and feel free to email us directly at contact@GameRevenant.com.

Frank DiCola is the founder of Game Revenant and the artist for Where Shadows Slumber.
Inside Animation: Face Morphing

When I was showing off Where Shadows Slumber earlier this year at MAGFest 2018, one of my fellow game developers gave me a stellar compliment. As he watched the game’s second cutscene, he said “these animations are so evocative.” What he meant was that the animation was conveying a large amount of emotional detail even though the characters never speak a word. This is especially impressive considering the cutscenes don’t even have sound effects yet!

Sometimes, we only remember the one negative comment we get in a sea of compliments. But for once, a positive remark stuck with me. Evocative. If there’s one thing I can do as the animator for this game, it is to ensure that the player feels a range of emotions when they watch the game’s story unfold. But how can this be accomplished when our character is so small on the screen? More practically, how is this actually achieved using a 3D modeling studio and the Unity 3D engine?

This blog post is a quick glimpse at how I set up the facial animation rigs for the characters in Where Shadows Slumber.


3Ds

First: The Old and Stupid Way

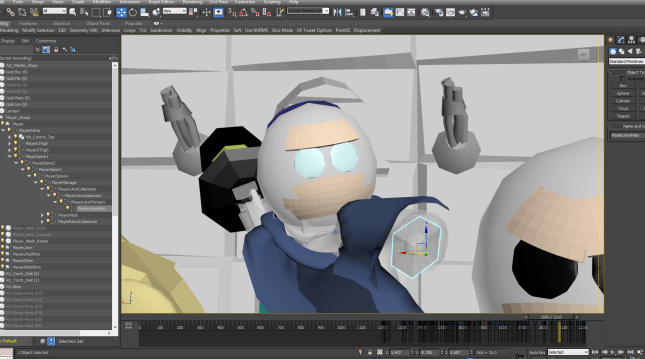
Before I show you how I animate the faces in the current build of the game, I should show you the first way I tried it back when we were creating a Demo of the game. The old Obe model, shown above, had a perfect sphere for a head. In the image above, it’s grey. Then, I put in two snowman eyeballs as flat discs (they look teal in the image above) and a mouth plane that wrapped around his ball-head (obscured above). So far, so bad – nothing can be animated here! These objects are static. His face won’t look evocative at all.

My answer was to create little patches of skin that could be moved around to simulate facial animation. Though they look peach in this image above, they would blend in 100% with his skin tone thanks to Jack’s shader. My philosophy was simple – if the skin slabs were out of the way, his eyes were open. If they blocked his eyes partially, that was a facial expression. In the image above, near the bottom-right, you can see that Obe’s unsuspecting opponent has his skin slabs set to angry because they partially block his eyes in a slanted direction. By moving the slabs around in time with the animation, facial expressions were simulated.

This was supposed to be a “quick and dirty” way of doing facial animation, but it ended up being a “takes forever and looks terrible” way of doing facial animation. I’ll never return to an amateur system like this! The silliest part is that 3DS Max has a system perfectly set up for preset facial animations called Morpher.


HeadAnimations

The Morpher Method

By spending more time modeling Obe’s head, I was able to create a flexible skull with some textures mapped onto it (black for features, white for skin) and preset animations with Morpher. This skull can be tuned to different emotions, and even combinations of emotions. Above, you can see how Obe can express a range of poses: angry, devastated, confused, joyous, blissful. Now that you’ve seen the final product above, here’s how to set up your own:

Morph-Base

Step 1: Model the base head

Spend some time crafting a base head for your character. Note that you’ll be unable to edit it once you begin Morphing, so take your time. Create flexible eyes, a mouth, a nose and ears (if your character has those) and be sure to add enough loops so they can move around later without looking jagged. This time, I gave Obe detached cartoon eyebrows so I could be more ambitious with his facial expressions.

Morph-Poses.JPG

Step 2: Duplicate the head as a Copy (not an Instance) and pose it

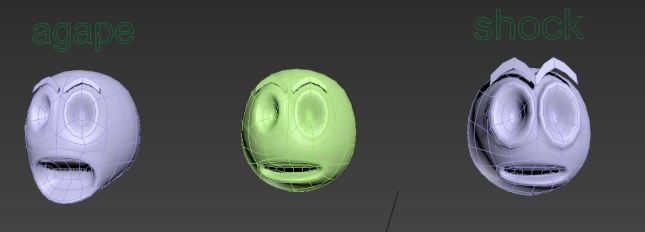
Now you must copy the base head and move it somewhere else in the scene. (I like to make a Game of Thrones style wall of faces.) Edit the vertices on this model into an extreme pose, such as furious anger or deep sadness. This pose will be what “100%” of this emotion looks like. Note that the vertices from the base head are going to move (morph, if you prefer) into the new positions you give them here, as well as every point in-between. Pay close attention to the topology of your model when you choose new positions for these verts, and your animations will look smooth. Above, you can see I do mouth poses and eye poses separately, so a wide open mouth (agape) can exist separately or simultaneously with wide open eyes and raised eyebrows (shock).

Morph-Combo

Step 3: Connect your pose to the base head in the Morpher modifier

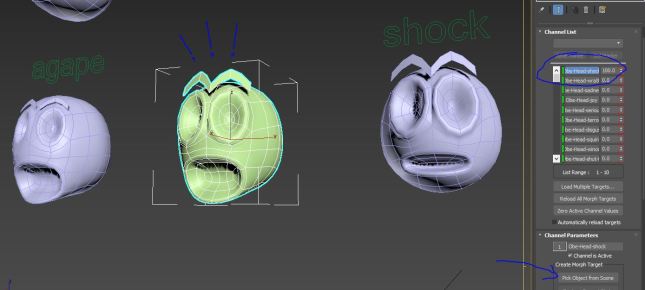
The base head will have the Morpher modifier on it. None of the others need it. From the base head, you can use Pick Object From Scene to slot in certain poses as animation sliders. Then, using the arrows shown next to the poses, you can “morph” these targets from 0 to 100. 0 is going to look like your base head – 100 is going to look like 100% of the pose. If you combine two poses, as I did above, you may get weird results. But in this case, shocked eyes and a mouth agape work well together.

Morph-Gallery.JPG

Step 4: Repeat Steps 2 and 3 for every face pose you’ll need for this character

I made separate poses for Obe’s mouth (left of center) and his eyes (right of center). The yellow shape in the center is his base head. I tried to do every emotion I’d need, as well as building blocks like “shut R” for the right eye being closed. One thing I didn’t need to do is detailed mouth animation for talking, since he never says anything in a real human language. He just wails in terror a lot. But if you were doing this for a regular animated film, you’d want a whole set of mouth animations for the various sounds we make with our mouths (Chuh! Puh! Quah! Teh!) I’m happy I didn’t need that, because I hate doing those.

Morph-Swag.JPG

Step 5: Animate in a Scene when it’s all ready

This massive setup time bears fruit once you begin animating. Having a flexible facial animation system is remarkable. I love this system so much, and I never have to worry about whether Obe is expressing the emotion I want. Everything is correct and his face is super easy to read, even at a distance. Here, he’s giving an “…OK” kind of look as he escapes prison early in the game’s story. Though this look is not programmed in directly, it’s a combination of four Morph Targets: left eye closed, right eye closed, mouth closed, and “serious.” That’s the beauty of working with Morpher!


If you’re building your own facial animation system, be warned that it’s a lot of work. However, it will pay off in the end. Good luck making your animations evocative! Feel free to ask me any questions in the comments, over email, or on Twitter. I’m always eager to help. Happy blending, everyone!


= = = = = = = = = = = = = = = = = = = = = = = = = = = = = = = = = = = =

We hope you enjoyed this technical look at the systems behind the game’s artwork. You can find out more about our game at WhereShadowsSlumber.com, ask us on Twitter (@GameRevenant), Facebookitch.io, or Twitch, and feel free to email us directly at contact@GameRevenant.com.

Frank DiCola is the founder of Game Revenant and the artist for Where Shadows Slumber.